Are you interested in setting up Kali Linux on your system using VirtualBox but unsure where to start? No worries! This beginner-friendly guide will walk you through every step clearly and simply. Even if you’re completely new to the process, by following this article carefully, you will have Kali Linux running on your VirtualBox without any confusion.
Let’s get started!
Step 1: Download the Required Files
Before you can install Kali Linux, you need to download three important components:
- VirtualBox
- Kali Linux ISO
- Visual C++ Redistributable
Here’s how you can get them:
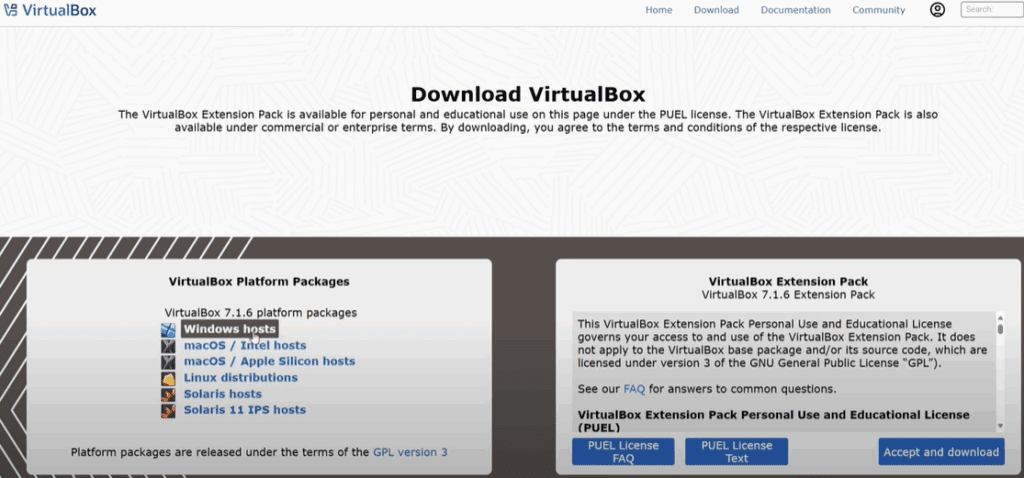
Download VirtualBox
- Open your web browser.
- Search for “VirtualBox Download”.
- Visit the official website: www.virtualbox.org.
- On the homepage, look for the section titled “Windows hosts” and click on it.
- The download for VirtualBox will start automatically.
Download Kali Linux
- In your browser, search for “Kali Linux Download”.
- Open the official Kali Linux website.
- Find the section labeled “Installer Images”.
- Choose the appropriate version (typically x86 64-bit for most users) and click the Download button next to it.
Download Visual C++ Redistributable
- Open your browser and search for “Visual C++ Redistributable latest supported”.
- Visit Microsoft’s official site.
- Scroll down to the download section.
- Download the x64 version of Visual C++ Redistributable.
Step 2: Install Visual C++ Redistributable
Before installing VirtualBox, it’s recommended to install the Visual C++ Redistributable. This step helps prevent potential errors that might occur during the VirtualBox installation.
- Open the downloaded Visual C++ setup file.
- Agree to the terms and click Install.
- Wait for the installation to complete.
Installing this ensures that VirtualBox installs smoothly without any issues.
Step 3: Install VirtualBox
Now that the Visual C++ redistributable is installed:
- Open the VirtualBox installer file you downloaded.
- Follow the on-screen instructions to complete the installation.
- Once done, launch VirtualBox.
Step 4: Set Up Kali Linux in VirtualBox
With VirtualBox installed, it’s time to set up Kali Linux:
Create a New Virtual Machine
- Open VirtualBox and click the New button.
- For Name, type
Kali. - For Type, select Linux.
- For Version, choose Debian (64-bit).
Allocate RAM (Base Memory)
- You will see an option called Base Memory. This defines how much RAM you want to allocate to the Kali Linux virtual machine.
- Check how much total RAM your PC has:
- Right-click the taskbar and open Task Manager.
- Go to the Performance tab and click on Memory.
- Suggested RAM allocation:
- If you have 4GB total RAM → allocate 2GB.
- If you have 8GB total RAM → allocate 4GB.
- If you have 16GB total RAM → allocate 8GB.
Tip: Allocate half of your system’s total RAM to Kali Linux for optimal performance.
Allocate Processor Cores
- VirtualBox will also ask about CPU cores.
- More cores mean better performance for the virtual machine.
- Suggested CPU core allocation:
- Always allocate at least 2 cores if available.
- If your system has 6 cores, allocate 3 cores to Kali Linux.
Tip: Allocate about half of your available CPU cores to the virtual machine.
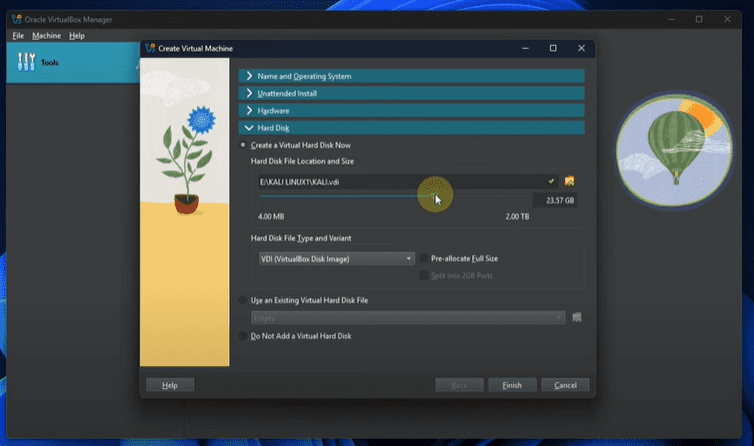
Configure Storage Location
By default, VirtualBox stores the virtual machine in your C Drive. If your C Drive has limited space, you should change the storage location:


- Click the folder icon next to the storage path.
- Choose another drive (like D Drive or E Drive) where you have more free space.
- Create a new folder named KaliLinux1 (or any name you prefer) to store the virtual machine files.
This helps in preventing any storage issues during installation.
Step 5: Install Kali Linux
Now that the virtual machine is configured:
- Select the newly created Kali virtual machine.
- Click Start.
- When prompted, browse to the downloaded Kali Linux ISO file and select it.
- Follow the on-screen installation steps within the virtual machine to complete the setup of Kali Linux.
Congratulations! You now have Kali Linux installed on VirtualBox.
Final Thoughts
Installing Kali Linux on VirtualBox may seem complicated at first, but if you carefully follow this article, you can set it up easily even if you are a beginner. Take your time with each step, double-check your settings, and you’ll be ready to explore Kali Linux for learning, testing, or ethical hacking practices.
If you need tutorials on more topics, feel free to let us know in the comments section below. We’ll keep updating useful articles like this one for you.
Tags: kali linux, virtualbox installation, kali linux on virtualbox, download kali linux, setup virtualbox, install kali linux step by step, beginner guide kali linux, install visual c++, linux tutorial, virtual machine setup
Hashtags: #kalilinux #virtualbox #linuxsetup #kalilinuxinstallation #techguide #beginnersguide #virtualmachines #ethicalhacking


