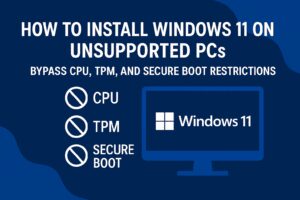
Are you looking to improve the performance of your Windows 11 24H2? Well, you’re in the right place! Debloating your Windows 11 ISO before installation can make your system much lighter, faster, and more efficient. In this detailed guide, we’ll walk you through the exact steps to debloat Windows 11 24H2 ISO, allowing for a smoother experience after installation.
Why Debloat Windows 11?
The default Windows 11 installation comes packed with various unnecessary features and telemetry services, which can slow down your system. By debloating the ISO, you reduce system resource usage, allowing your PC to run smoother and more efficiently. Whether you’re a gamer, developer, or casual user, a lighter operating system means faster boot times and better overall performance.
Step 1: Download Windows 11 24H2 ISO
Start by downloading the official Windows 11 24H2 ISO from Microsoft’s website.
- Open your browser and search for “Windows 11 ISO download.”
- Choose the “Windows 11 Multi-Edition” option from the dropdown menu.
- Select your preferred product language and confirm.
- Click on the 64-bit download option to start the download.
This will be about a 5.4GB file, which is already lighter than previous Windows versions like 22H2 and 23H2. But we’ll reduce this even further.
Step 2: Find Chris Titus’ Debloat Script
Now that you’ve downloaded the ISO, the next step is to debloat it using the popular tool created by Chris Titus.
- Open a new tab in your browser and search for “Chris Titus Windows Utility.”
- Navigate to the official website and find the “Most Popular Windows Utility” section.
- Scroll down to find the documentation link for the debloat script.
Chris Titus’ tool is highly regarded for making Windows installations leaner by removing unnecessary bloatware and telemetry services.
Step 3: Run the Debloat Script
Once you have accessed Chris Titus’ debloat script, follow these steps:
- Copy the provided script from the documentation page.
- Open Windows PowerShell as an administrator. To do this:
- Type “PowerShell” into your Windows search bar.
- Right-click and choose “Run as Administrator.”
- Paste the copied script into PowerShell by right-clicking inside the window and hit Enter.
The script will start running, and depending on your internet connection, it may take a few moments for everything to load. This script works by removing telemetry services, setting up local user accounts, and ensuring no internet is required for installing essential apps.
Step 4: Select Windows 11 ISO and Apply the Script
Once the script is running, the next step is to load your Windows 11 ISO into the tool.
- Click on “Select Windows ISO” in the tool’s interface.
- Navigate to where you downloaded the Windows 11 24H2 ISO file and select it.
- Wait for the ISO to load, which might take a few minutes.
After the ISO loads, you’ll see multiple options for customization. If you want to stick with Windows 11 Pro, you can proceed without changing the edition. Otherwise, you can switch to Windows 11 Home or another edition based on your needs.
Step 5: Start the Debloating Process
Once you’ve selected the appropriate edition of Windows, it’s time to start the debloating process.


- Click on “Start the Process.”
- The tool will ask where you want to save the debloated ISO. Choose your desired location and name the file, such as “Debloated_Win11.iso.”
- After clicking “Save,” the process will begin. Don’t worry if it takes a few minutes – this is normal.
The PowerShell window will show the progress, including mounting and unmounting of the image, as well as removing unnecessary components.
Step 6: Install Your Debloated ISO
Once the process is complete, you’ll have a lighter, faster Windows 11 ISO ready for installation.
- Use a bootable USB tool like Rufus to create a bootable drive with your new ISO.
- Boot your PC from the USB drive and start the installation process.
Step 7: Check the Results
After installation, you’ll notice the difference right away.
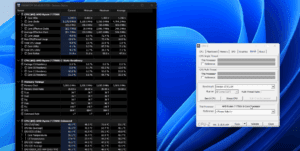
- Space saved: The debloated ISO reduces the installation size by approximately 800MB to 1GB. For example, the original ISO was around 5.4GB, but the debloated version is about 4.6GB.
- Faster installation: The installation process is quicker since fewer components need to be copied and configured.
- Lower resource usage: The debloated Windows 11 ISO takes up less disk space (around 7GB instead of 20GB) and uses significantly fewer system resources.
- Process count: Dropped from around 159 processes to 118.
- Thread count: Reduced from 2000 to about 1200.
- Handle count: Decreased from 67,000 to around 43,000.
These optimizations result in noticeably better performance, making your system faster and more responsive.
Final Thoughts
By following this guide, you’ve successfully debloated your Windows 11 24H2 ISO, which not only makes the installation smoother but also optimizes performance post-installation. Whether you’re setting up a fresh system or trying to squeeze more performance out of an older device, this debloating process can make a significant difference.
Hashtags: #Windows11 #DebloatWindows #WindowsOptimization #FasterPC #ChrisTitus