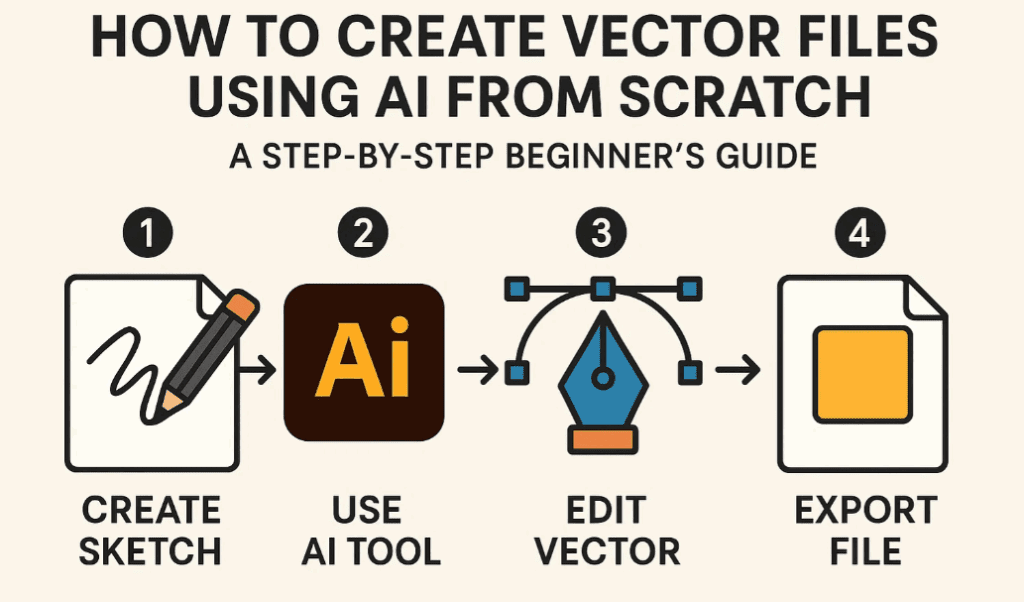
Creating high-quality vector files using AI has become easier and more efficient, thanks to various free and commercial tools. In this detailed guide, we will explore how you can go from idea to submission-ready vector art using AI tools and a structured workflow. Whether you’re a microstock contributor or a designer, this article will walk you through everything step-by-step.
🧭 Step 1: Content Research (Understand What’s Trending)
To create vector art that sells or performs well, the first step is research.
- Visit AOB Stock (https://www.aobstock.com).
- Navigate to “Insights” → “Recent Top Sellers” and filter for Vector assets.
- Observe:
- What styles are trending (colorful vector art, line art, icons, 2D illustrations).
- What categories are popular (e.g., Transportation Icon Sets).
- Click on trending files to check:
- Titles and descriptions
- Whether the content is AI-generated
- The file structure (whether a full set or individual items)
Pro Tip: Don’t copy exactly. Create a variation of the trending idea to avoid rejection due to duplication.
🧠 Step 2: Prompt Writing for AI Image Generation
Once you identify a design concept:
- Extract the title/description from a top-selling design (e.g., “Transportation Vehicle Icon Set”).
- Use this as a prompt for your AI image generator.
- Alternatively, you can:
- Copy the image
- Paste it into ChatGPT and request:
“Write an AI prompt based on this image”
This gives you a ready-to-use descriptive prompt.
🖼 Step 3: Generate AI Images
Use any of these free or paid tools for generating high-quality images:
- Microsoft Copilot Designer
- Lando.ai
- Ideogram
- [Midjourney, Firefly, Playground AI (if you have access)]
Steps for Copilot:
- Open Copilot Designer.
- Paste your prompt.
- Click Generate.
- Choose the best output and download it.
Note: Look for image quality issues like distortion, asymmetry, or incorrect paths. It’s better to reject those images early.
🧹 Step 4: Image Cleanup and Editing
Before converting to vector:
- Select the best image outputs.
- Avoid images with too much visual distortion or broken elements.
✏️ Step 5: Convert Image to Vector Format
You can use two main tools here:
🔧 Tool 1: Vector Magic
- Upload your image.
- Choose Fully Automatic, Basic, or Advanced mode.
- Wait for the conversion.
- Download as
.AIor.EPS.
🎨 Tool 2: Adobe Illustrator
- Open your
.AIor.EPSfile in Illustrator. - Check and refine paths manually:
- Unmask and clean unwanted elements
- Use the Smooth Tool to fix broken or jagged curves
- Align icons properly and check symmetry
- Zoom in and review every shape for flaws.
- Delete unnecessary layers or graphics.
🗂 Step 6: Finalizing and Exporting
After vector editing:
- Export your final file in
.AIand/or.EPSformat. - Use ChatGPT to write a metadata description and tags.
- Submit your file to stock websites like AOB Stock or others.
⚠️ Important Notes on Color Use
- Avoid smooth gradient colors in vector art.
- Gradients can result in messy paths or unwanted patches when traced.
- Stick with flat colors, solid fills, or outline-only designs for best results and faster approvals.
❓ Frequently Asked Questions (FAQs)
Q1: Can I use any AI image generator for this purpose?
Yes, but ensure it allows commercial usage. Microsoft Copilot is a great free tool currently supporting commercial-friendly outputs.

Q2: Why is my image being rejected after upload?
Common reasons include:
- Similarity to existing designs
- Distorted paths
- Unrefined vector edges
- Use of gradients that don’t trace well
Q3: Can I upload color vectors?
Yes, but use solid colors only. Avoid gradients as they may not trace well and appear unprofessional.
Q4: What are the best file formats to upload?.AI and .EPS are widely accepted on most stock platforms.
✅ Conclusion
AI can drastically simplify the vector creation process when used effectively. Follow this streamlined approach:
- Research →
- Prompt Creation →
- Image Generation →
- Vector Conversion →
- Illustrator Cleanup →
- Final Submission
This workflow can save time, improve output quality, and increase your chances of earning from microstock platforms.
🔗 Useful Links
- AOB Stock: https://www.aobstock.com
- Microsoft Copilot Designer: https://designer.microsoft.com
- Vector Magic: https://vectormagic.com
- Adobe Illustrator: https://adobe.com/products/illustrator
🏷 Tags
vector creation, AI tools, stock vector, Adobe Illustrator, vector magic, microstock, image to vector, AI-generated vector, icon set creation, commercial vector workflow
🔖 Hashtags
#VectorDesign #AIArt #StockVectors #VectorMagic #AdobeIllustrator #AIWorkflow #ImageToVector #MicrostockDesign #AIDesign #FreeAItools
📢 Disclaimer
Always verify the licensing terms of the AI tools you use. While tools like Microsoft Designer may offer free usage, commercial rights and image licensing can change over time. Ensure your generated art is original and meets the platform’s submission guidelines.


