There are certain situations where you may need your virtual machines to communicate with each other but remain completely isolated from the external internet. This setup is especially useful for testing, training labs, and development environments. In this article, we’ll walk you through how to create an internal network in VirtualBox and connect two virtual machines—a Windows 10 client and a Windows Server 2019 machine—within this isolated network.
Let’s get started!
🔧 Why Use an Internal Network?
VirtualBox provides different network modes such as NAT, Bridged, Host-Only, and Internal Networking. The Internal Network mode:
- Allows VMs to communicate with each other.
- Keeps them isolated from the host system and the internet.
- Is ideal for simulating internal infrastructure or secure lab environments.
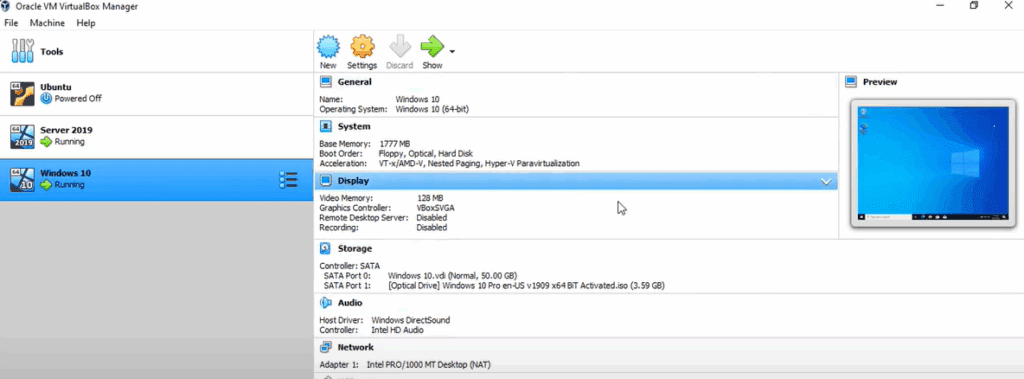
🖥️ Default Setup: VMs Connected via NAT
Initially, both virtual machines (Windows 10 and Windows Server 2019) are connected through NAT (Network Address Translation). This means they can access the internet via the host machine, but they cannot communicate directly with each other on a private subnet unless configured to do so.
🔄 Step-by-Step Guide to Creating an Internal Network
✅ Step 1: Configure VirtualBox Network Settings
- Open VirtualBox.
- Select your virtual machine (e.g., Windows 10).
- Go to Settings > Network.
- In Adapter 2, check Enable Network Adapter.
- Set Attached to as Internal Network.
- Name the network (e.g.,
InternalNet).
Repeat the above steps for the Windows Server 2019 VM, using the same internal network name (InternalNet).
✅ Step 2: Boot the Virtual Machines
Now start both virtual machines (Windows 10 and Windows Server 2019). They are now connected via an internal network but require IP configuration for communication.
✅ Step 3: Assign Static IP Addresses
To ensure communication, assign static IP addresses to each virtual machine:
🔹 On Windows Server 2019:
- Go to Control Panel > Network and Sharing Center > Change Adapter Settings.
- Right-click on the Internal Adapter > Properties.
- Select Internet Protocol Version 4 (TCP/IPv4) > Properties.
- Assign an IP (e.g.,
192.168.100.1) and subnet mask (e.g.,255.255.255.0).
🔹 On Windows 10:
- Follow the same path and assign an IP (e.g.,
192.168.100.2) with the same subnet mask.
✅ Step 4: Test the Internal Network Connection
With both VMs configured with IPs in the same subnet, test connectivity:
🔹 From Windows 10 to Windows Server 2019:
bashCopyEditping 192.168.100.1
You should receive replies confirming that the machines can talk to each other.
🔹 From Windows Server 2019 to Windows 10:
bashCopyEditping 192.168.100.2
You may receive a timeout error. This is typically due to File and Printer Sharing being disabled.
🛠️ Enabling File and Printer Sharing on Windows 10
To allow ICMP (ping) traffic:


- Open Control Panel > Network and Sharing Center > Advanced sharing settings.
- Turn on File and Printer Sharing.
- Apply changes and try pinging again.
This setting enables the necessary firewall rules to allow ping requests.
✅ Final Thoughts
Creating an internal network in VirtualBox is an excellent way to simulate real-world networking scenarios without needing internet access. It enhances privacy, adds a layer of security, and is ideal for controlled lab environments.
You now have a working isolated network between two virtual machines. This method can be extended to more VMs and even more complex setups such as domain controllers, clients, and firewalls.
Tags: virtualbox internal network, virtual machines communication, create internal network virtualbox, windows 10 vm setup, windows server 2019 vm, ubuntu network configuration, private network virtualbox, virtualbox static ip setup, isolated virtual network, virtualbox networking tutorial
Hashtags: #VirtualBox #VMs #Networking #InternalNetwork #VirtualMachines #Windows10 #WindowsServer2019 #TechTutorial #NetworkSetup #IsolationTesting


