Modern computers use UEFI (Unified Extensible Firmware Interface) instead of the older BIOS (Basic Input/Output System). UEFI offers better security, faster boot times, support for larger hard drives, and more advanced features.
However, in order to use UEFI on your Windows 10 system, your system disk must use the GPT (GUID Partition Table) partition style instead of MBR (Master Boot Record). If your drive is still formatted as MBR, you will need to convert it to GPT before switching your firmware settings to UEFI.
In this article, you’ll learn how to safely convert an MBR disk to GPT using built-in Windows tools, without losing your data.
🧠 What’s the Difference Between MBR and GPT?
- MBR: An older partitioning method that supports up to 2TB drives and a maximum of 4 primary partitions.
- GPT: A modern partition style that supports drives larger than 2TB, allows unlimited partitions (Windows supports up to 128), and is required for UEFI boot mode.
⚠️ Before You Begin
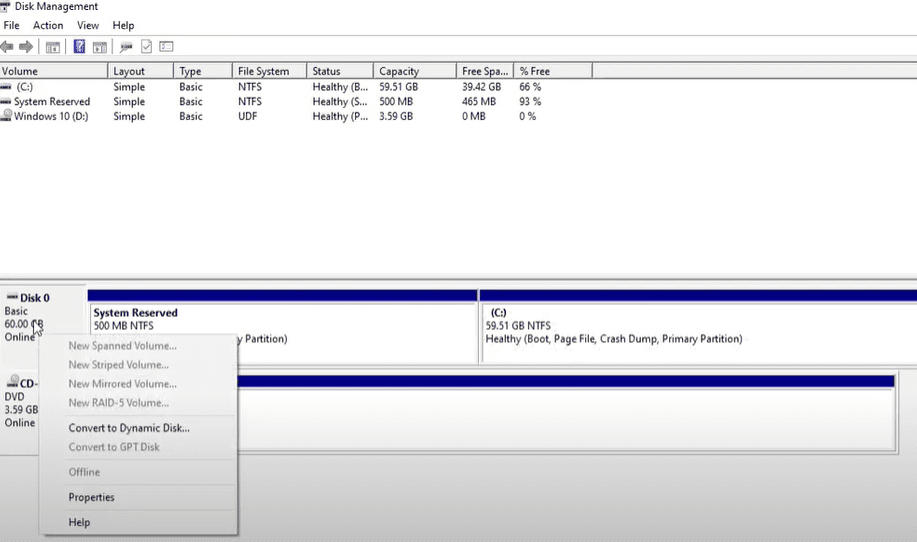
1. Check Your Current Partition Style
You need to confirm whether your disk is using MBR or GPT.
Steps:
- Press
Windows + Xand choose Disk Management. - Right-click on your system disk (usually Disk 0) and choose Properties.
- Go to the Volumes tab.
- Look for the Partition style entry:
- If it says MBR, you need to convert.
- If it says GPT, you’re already set.
🛑 Important: Backup Your Data
While the process we’re using is designed to preserve your data, it’s always best to back up important files to an external drive or cloud service before making changes to your disk structure.
🛠️ Step-by-Step: Convert MBR to GPT Using MBR2GPT Tool
Windows 10 includes a built-in tool called MBR2GPT that allows you to convert the partition style without losing data.
✅ Step 1: Open Command Prompt as Administrator
- Press
Start, type cmd, right-click Command Prompt, and choose Run as administrator.
✅ Step 2: Validate Your Disk for Conversion
Use the validation command to make sure your disk is eligible for conversion.
mbr2gpt /validate /allowFullOS
If it returns “Validation completed successfully”, you’re good to go.
✅ Step 3: Convert MBR to GPT
Now run the actual conversion command:
mbr2gpt /convert /allowFullOS
This command will:


- Convert the disk from MBR to GPT.
- Update the boot configuration.
- Preserve your data and OS installation.
Once completed, you will see a message saying the conversion was successful.
🔁 Step 4: Change BIOS Settings to UEFI
After converting your disk, you need to switch the firmware mode from Legacy BIOS to UEFI.
Steps:
- Restart your PC.
- During startup, press the designated key to enter BIOS/UEFI Setup (usually
F2,DEL,ESC, orF10depending on your device). - Find the setting for Boot Mode or UEFI/Legacy Boot.
- Change it from Legacy or CSM to UEFI.
- Save changes and exit.
🚀 Done! What Happens Next?
Your PC should now:
- Boot using UEFI firmware.
- Be running on a GPT-partitioned drive.
- Take advantage of all UEFI features, including Secure Boot and faster boot performance.
🧩 Troubleshooting
- Conversion Failed?
- Make sure you’re using a basic disk, not a dynamic one.
- Your system disk must have no more than three partitions.
- PC doesn’t boot after BIOS change?
- Go back into BIOS and ensure UEFI boot is properly configured.
- Re-check boot priority order and Secure Boot settings.
📝 Summary
By converting your system disk from MBR to GPT, you can take full advantage of modern hardware and software capabilities with UEFI. Using the built-in MBR2GPT tool in Windows 10, this process can be completed safely and efficiently without formatting your drive or reinstalling Windows.
Tags: mbr to gpt windows 10, convert mbr to gpt, mbr2gpt tool, switch to uefi, uefi boot windows 10, windows 10 gpt conversion, bios to uefi migration, secure boot setup, disk management windows, gpt partition style
Hashtags: #Windows10 #MBR2GPT #UEFI #BIOS #TechGuide #SystemSetup #GPT #MBR #WindowsTips #SecureBoot


