Upgrading your system drive to a faster NVMe SSD can significantly boost your computer’s speed and performance. Whether you’re using a laptop or a desktop, cloning your existing SSD to a new NVMe drive doesn’t have to be complicated. In this article, we’ll walk you through two proven methods to clone your SSD: one using Clonezilla (free and professional) and the other using EaseUS Disk Copy (easy and user-friendly).
What You’ll Need
Before we begin, make sure you have the following tools and components ready:
Hardware:
- Old SSD (the one with your operating system and data)
- New NVMe M.2 SSD (we’re using a 1TB HP NVMe SSD in this example)
- NVMe M.2 cooler (optional, but helps with thermal management)
- PCIe to NVMe adapter (only if your desktop motherboard doesn’t support NVMe directly)
- Screwdrivers (iFixit kit is a great option)
- USB Flash Drive (for Clonezilla ISO boot)
Software:
- Clonezilla (Free tool for professional disk cloning)
- EaseUS Disk Copy (Commercial software with a simple interface)
- Rufus (to make a bootable USB for Clonezilla)
Method 1: Clone Using Clonezilla (Free & Professional)
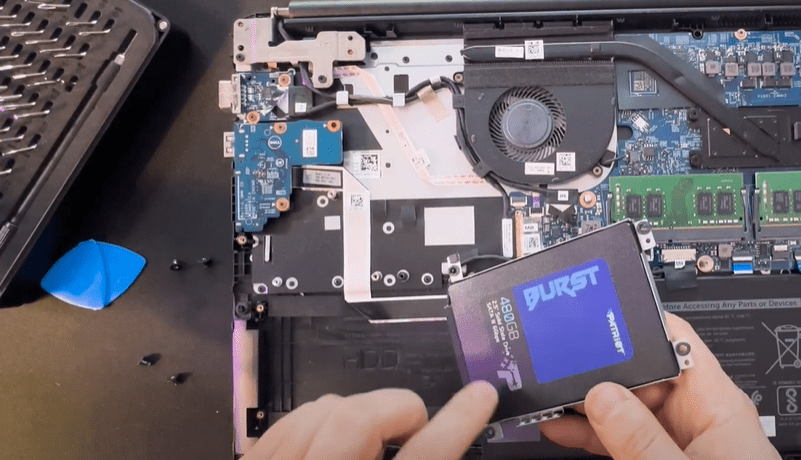
Step 1: Install the New NVMe SSD
- Laptop: Open the back cover, locate the M.2 slot, insert the NVMe drive, and secure it with the small screw.
- Desktop:
- Check your motherboard for an M.2 slot.
- If absent, use a PCIe to NVMe adapter to install the drive.
- Attach a thermal pad and cooler if necessary.
- Insert the adapter into an available PCIe slot (preferably not directly next to your GPU).
Step 2: Enable the NVMe Port in BIOS
- Enter BIOS by pressing
Esc,F2, orF10during startup (depends on your system). - Ensure M.2 ports or PCIe slot (where NVMe is installed) are enabled under Port Options or Slot Settings.
Step 3: Create a Bootable Clonezilla USB
- Download Clonezilla from the official website.
- Use Rufus to write the ISO to a USB flash drive.
- Boot from the USB by entering your boot menu (e.g.,
F9,F12, orEscduring startup).
Step 4: Clone the Drive
- Choose “device-device” mode in Clonezilla.
- Select the source drive (your old SSD).
- Select the target drive (your new NVMe SSD).
- Skip disk checking (optional).
- Confirm the operation (type
yeswhen prompted). - Let the cloning process finish, then shut down your system.
Step 5: Finalize the Setup
- Remove the old SSD from your system.
- Boot from the new NVMe drive.
- If there’s unallocated space on the new drive, extend your system partition using Windows Disk Management.
Method 2: Clone Using EaseUS Disk Copy (Simpler Option)
If Clonezilla feels too technical, you can use EaseUS Disk Copy for a much simpler process.
Step-by-Step:
- Install both your old SSD and new NVMe drive in your system.
- Download and open EaseUS Disk Copy.
- Select Disk Mode and choose:
- Source Disk: Your old SSD.
- Target Disk: Your new NVMe SSD.
- Enable the “Auto-fit the disk” option to automatically expand partitions and use the full capacity.
- Click Proceed to begin the cloning process.
✅ This method is beginner-friendly and only takes about 5-10 minutes.
After Cloning:
- Shut down the PC and remove the old SSD.
- Boot from the NVMe SSD.
- Your system should start up exactly as before, but now with faster performance and more space (if you upgraded to a larger drive).
Conclusion
Cloning your system drive from an older SSD to a newer NVMe drive is a great way to speed up your computer without reinstalling your operating system. Whether you go with Clonezilla for a free, professional approach or choose EaseUS Disk Copy for simplicity, you’ll end up with a smooth and efficient upgrade.
Make sure to handle your components carefully and double-check your BIOS settings before starting the cloning process.
Happy upgrading!
Tags:
nvme, ssd, cloning, clonezilla, easeus, upgrade, laptop, desktop, pc performance, data migration, boot drive, m2 ssd, disk copy, ssd cloning tutorial, computer optimization
Hashtags:
#NVME #SSDUpgrade #Clonezilla #EaseUS #DataMigration #LaptopUpgrade #DesktopUpgrade #M2SSD #DiskCloning #TechTips #ComputerPerformance #TipsToFix