Over time, your Windows 10 or 11 PC can begin to feel sluggish—especially when multitasking or using heavy applications. One common cause of this slowdown is a buildup of RAM cache, also known as cache memory. While cache is designed to speed up access to frequently used data, excessive cached memory can actually reduce available RAM and hinder system performance.
In this article, you’ll learn two effective methods to clear RAM cache—one manual, and the other automated—using trusted Microsoft tools. These methods can free up memory instantly and improve overall system responsiveness.
🧠 What Is RAM Cache and Why Clear It?
RAM cache temporarily stores frequently used data so your PC can access it faster. While helpful, over time it can occupy a significant portion of your RAM, reducing available memory for active processes.
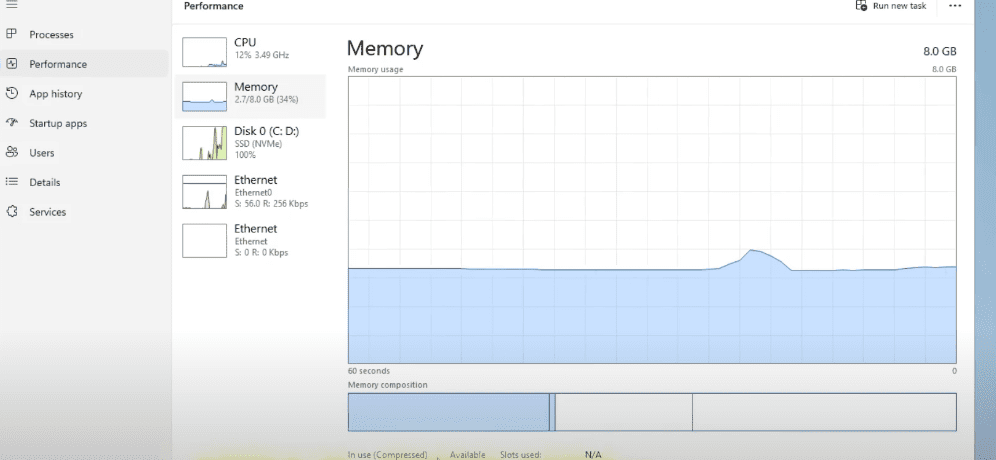
To check how much RAM is cached on your system:
- Right-click on the Taskbar and choose Task Manager.
- Go to the Performance tab.
- Click on Memory.
- Look for Cached at the bottom.
If you see a high amount (e.g., 2 GB or more), it’s time to free it up.
🔧 Method 1: Manually Clear RAM Cache Using RAMMap (Microsoft Tool)
✅ Step-by-Step Guide:
- Open your browser and search for RAMMap or go to the official Microsoft Sysinternals page:
🔗 https://learn.microsoft.com/en-us/sysinternals/downloads/rammap - Download the ZIP file and extract it using Right Click > Extract All.
- Inside the extracted folder, right-click on
RAMMap64.exeand select Run as Administrator. - Once RAMMap opens, click on Empty from the top menu.
- Select Empty Standby List.
Your cached memory will be instantly cleared. Reopen Task Manager and observe the reduced cache usage—e.g., from 2 GB to as low as 263 MB.
📝 Note: Cached memory will build up again over time. Repeat this process daily or a few times a week as needed.
⚙️ Method 2: Automatically Clear RAM Cache Using Task Scheduler
If you want to automate the process, you can schedule your PC to clear cache memory at regular intervals using a small utility called EmptyStandbyList.
✅ Step-by-Step Guide:
- Download EmptyStandbyList.exe from this trusted archive site:
🔗 https://wj32.org/wp/software/empty-standby-list/ - Open Windows Search and type Task Scheduler, then open it.
- On the right, click Create Task.
- General Tab Settings:
- Name the task:
RAM Cache Clear - Click Change User or Group > Advanced > Find Now > Select
SYSTEM> OK. - Check Run with highest privileges.
- Under Configure for, select Windows 10 or Windows 11 depending on your OS.
- Name the task:
- Triggers Tab:
- Click New.
- Choose how often you want it to run (e.g., every 30 minutes or hourly).
- Under Advanced Settings, check Repeat task every and set your interval.
- Set for a duration of to Indefinitely.
- Make sure Enabled is checked and click OK.
- Actions Tab:
- Click New.
- Click Browse and locate the
EmptyStandbyList.exeyou downloaded. - Click OK to confirm.
- Save the task. You’ll now see it listed under Task Scheduler Library with status set to Ready.
✅ You’ve now set up an automated system that will periodically free up your RAM cache—no need for manual effort!
If you wish to pause or stop this task:
- Open Task Scheduler, right-click the task, and choose Disable or Delete.
💡 Benefits of Clearing RAM Cache
- Faster system performance
- Improved multitasking
- More available RAM for apps and games
- Reduced system lag over time
These tweaks are especially helpful if you’re running memory-intensive programs like video editors, emulators, or virtual machines.


⚠️ Disclaimer
These tools are developed and maintained by Microsoft or trusted independent developers. However, always ensure you download them from their official websites to avoid third-party tampering. Proceed with administrative tasks responsibly.
📌 Tags:
windows optimization, clear ram cache windows 10, windows 11 performance tips, task scheduler automation, empty standby list, RAMMap tool, microsoft sysinternals, boost pc speed, low memory fix, multitasking performance
📢 Hashtags:
#Windows10 #Windows11 #RAMOptimization #ClearRAM #BoostPCPerformance #TaskScheduler #Sysinternals #MicrosoftTools #EmptyStandbyList #TechGuide
By following this guide, you can easily maintain your PC’s performance—manually or automatically. Whether you’re a casual user or a power user, managing your RAM cache is one of the smartest ways to keep your system running at its best.


