If you’ve been experimenting with Linux alongside Windows 11, you might have encountered a common issue: a cluttered boot menu filled with entries from various Linux distributions. After trying out different distros, you may find that even after removing a Linux installation, its boot entry remains stubbornly present in the BIOS. Fortunately, there are solutions to clean up this mess, and in this post, I’ll share an effective tool that can help.
The Boot Menu Dilemma
As I explored different Linux distributions by dual booting with Windows 11, I noticed my boot menu was becoming increasingly crowded. Even after uninstalling certain Linux distros, their names lingered in the boot menu, which can be quite frustrating. My search for a solution led me to several methods, including:
- Manually Editing the EFI System: This requires mounting the EFI system and modifying boot entries, which can be complicated if you’re not familiar with the process.
- Using Command Line Tools: The BCD edit command can help manage boot entries, but it might not be the most user-friendly option.
- Third-Party Tools: Many users recommend tools like EasyBCD for managing multiple boot loaders. However, I found that the free version of EasyBCD doesn’t support Linux entries, which was disappointing.
A Solution: Visual BCD Editor
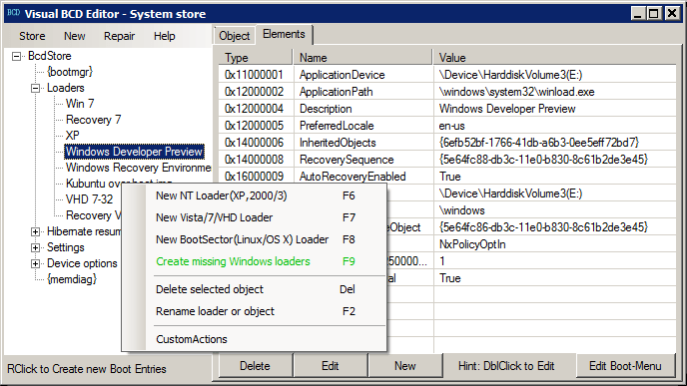
Luckily, I stumbled upon Visual BCD Editor, a tool that proved to be exactly what I needed. Unlike EasyBCD, Visual BCD Editor provides a user-friendly graphical interface for managing your boot configuration data (BCD), making it much easier to remove unwanted entries.
Getting Started with Visual BCD Editor
- Download the Tool: You can find Visual BCD Editor online. Installation is straightforward, and once it’s set up, you can open it to see a list of your boot loaders.
- Navigating the Interface: Upon launching the application, you’ll see a simple GUI that displays all your boot entries, including the ones for Linux distributions like Ubuntu and Fedora, alongside Windows 11.
- Removing Unwanted Entries: If you see a boot entry for a Linux distro you’ve already uninstalled, you can easily delete it. Just select the entry (for example, Ubuntu or Fedora) and click the delete button. Be cautious: only remove entries for systems you’re certain you no longer need.
Additional Features
Visual BCD Editor also includes a repair section that can be quite handy. If you encounter any issues with your boot loader, this tool can help repair it or restore your BCD configuration.
Why Visual BCD Editor is Essential for Dual Boot Users
If you’re a Linux enthusiast who often switches between different distributions, Visual BCD Editor is a must-have tool. It simplifies the process of managing boot entries, ensuring that your boot menu remains tidy and efficient.
Conclusion
In conclusion, if you’re dual booting Windows 11 with various Linux distributions and find your boot menu cluttered, give Visual BCD Editor a try. It’s a powerful tool that makes managing your boot entries straightforward and efficient. If you have any questions or suggestions, feel free to leave a comment below. I’d love to hear about your experiences or any tips you might have!
#Linux #Windows11 #DualBoot #BootMenu #VisualBCDEditor #TechTips #EasyBCD