If your Windows 11 PC is behaving unusually—whether it’s frequent app crashes, sudden slowdowns, or unexplained restarts—you can uncover the cause by checking Event Logs using the Event Viewer. This powerful built-in tool helps you dig into the technical history of your system and understand what’s happening behind the scenes.
In this article, we’ll walk you through the process of accessing and using Event Viewer in Windows 11 quickly and efficiently.
Why Check Event Logs?
Windows keeps a detailed log of system activities, such as software errors, hardware issues, security warnings, and system startup events. These logs can help you:
- Troubleshoot technical problems
- Investigate system slowdowns or failures
- Monitor security-related activity
- Identify recurring issues over time
Let’s go through the steps to open and use Event Viewer.
Step 1: Open Event Viewer via the Start Menu
- Right-click the Start button at the bottom-left corner of your screen.
- In the menu that appears, click on Event Viewer.
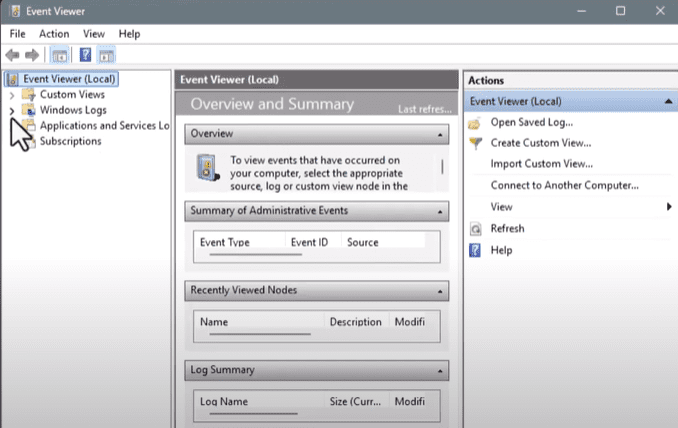
- This will launch the Event Viewer window, where various system and application logs are stored.
Step 2: Use Search if Event Viewer Doesn’t Appear
If you don’t see Event Viewer in the right-click menu:
- Click on the Search icon in the taskbar (magnifying glass).
- Type Event Viewer into the search box.
- When it appears in the search results, click on it to open the tool.
You can also launch Event Viewer using the Run dialog:
- Press
Windows + R, typeeventvwr, and hit Enter.
Step 3: Understand the Log Categories
Once Event Viewer is open, you’ll see a panel on the left listing different categories of logs. The most useful category for general diagnostics is Windows Logs, which includes:
- Application Logs – Logs from installed programs.
- System Logs – Events related to Windows system components (like drivers or services).
- Security Logs – Login attempts and access control entries.
These logs are your window into what your system is doing.
Step 4: Explore System Logs
- Click on System under the Windows Logs section.
- You’ll see a long list of events, each with:
- A timestamp
- A level (Information, Warning, or Error)
- A brief description of the event
This list can be filtered to help you focus on critical issues.
Step 5: View Detailed Information for Events
- Double-click any event to open its Event Properties window.
- Here, you’ll find additional technical details such as:
- Event ID
- Source (the system or service that triggered it)
- A description that often includes suggestions or error codes
You can use these details to search online for solutions or share them with a tech support team.
You can also:


- Filter Current Log to view only specific types of events (right-click the log name > Filter Current Log)
- Search for particular keywords using the Find option in the Actions pane.
Final Thoughts
Checking event logs in Windows 11 is a simple but powerful way to diagnose and understand system issues. Whether you’re troubleshooting a problem or just curious about how your PC is performing, Event Viewer offers detailed insights to guide your next steps.
Want to explore more system tools and troubleshooting tips? Stay tuned to this blog for clear, helpful tech guidance.
For more information on Event Viewer, visit Microsoft’s official support page:
👉 https://learn.microsoft.com/en-us/defender-endpoint/event-error-codes
Tags: Windows 11 event logs, how to open event viewer, troubleshoot Windows issues, system logs Windows 11, check PC errors, Windows 11 diagnostics, view system events, Event Viewer guide, Windows log viewer, find crash reports Windows
Hashtags:
#Windows11 #EventViewer #SystemLogs #PCDiagnostics #WindowsErrors #TechSupport #Troubleshooting #WindowsGuide #EventLogs #CheckPCIssues


