Have you ever felt that the username on your Windows 11 PC no longer represents you? Maybe it was set during setup and now feels outdated or incorrect. Good news—you don’t have to stick with it forever.
In this article, you’ll learn three simple yet effective ways to change the username for a local account in Windows 11. Whether you’re a tech-savvy user or someone who prefers the traditional route, we’ve got you covered.
Let’s begin with the first method, which is perfect for command-line enthusiasts.
✅ Method 1: Change Username Using Windows Terminal (Admin)
If you’re comfortable using PowerShell or Windows Terminal, this method gives you full control with just a few lines of code.
But first, let’s make sure you open the terminal with the correct permissions:
🧭 Steps to Follow:
Let’s get started!
- Right-click the Start button and select Terminal (Admin) or Windows PowerShell (Admin)
- Click ‘Yes’ on the User Account Control prompt
- To view your current username, type the following command:
Get-LocalUserThis will display all local user accounts on your system. - Identify your current account name (e.g.,
Techfan) from the list. - Now, type the following command to rename the user:
Rename-LocalUser -Name "Techfan" -NewName "Tech Guru"Replace"Techfan"with your current username and"Tech Guru"with your new desired name. Use quotes especially if your name includes spaces. - If you see an error, double-check the spelling or make sure you’re running the terminal as an admin.
- To apply the changes, sign out:
- Click Start → Your User Icon → Sign Out
- Sign back in, and your new username will appear on the login screen
🎉 That’s one way done! Now let’s try a more graphical approach.
🧩 Method 2: Rename Using Local Users and Groups (For Pro/Enterprise Users Only)
If you’re using Windows 11 Pro or Enterprise, you can use the built-in Local Users and Groups tool to rename your account.
Let’s move to the next step and try this GUI-based method:
🧭 Steps to Follow:
- Press Windows + R to open the Run dialog box
- Type the following command and press Enter:
lusrmgr.msc - Click Yes on the UAC prompt
- In the window that opens, on the left pane, click Users
- In the middle pane, find your user account (e.g.,
Tech Guru) - Right-click the account name → Select Rename
- Enter your new desired username (e.g.,
TechMaster) and press Enter - To apply the changes, sign out and log back in again
- Start → User Icon → Sign Out
- Log back in to see the updated name
🔒 Note: This feature is not available in Windows 11 Home Edition. If you’re using Home, try Method 1 or Method 3 instead.
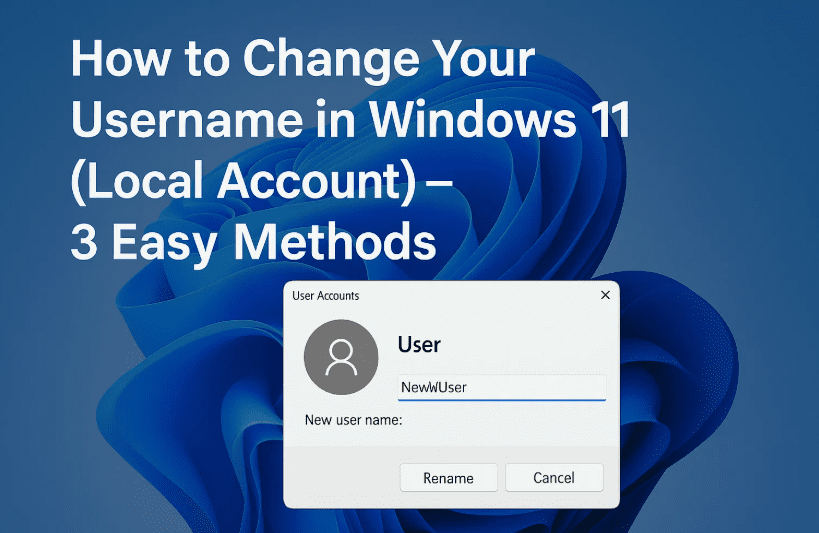
🧙♂️ Method 3: Rename via User Accounts Panel
Now for a classic method that’s been part of Windows for years and is available in all editions of Windows 11.


So far, you’ve done a great job following along. Let’s complete this with one more easy method.
🧭 Steps to Follow:
- Press Windows + R to open the Run dialog box
- Type the following and press Enter:
netplwiz - In the User Accounts window, click your user name to highlight it
- Click the Properties button
- In the User name field, enter your new name (e.g.,
Tech Expert)- Optionally, you can also add a Full name and Description if you want
- Click OK, then OK again to close the window
- Sign out and back in to see the changes on your login screen
⚠️ Important Notes & Tips
Before you go, here are some final pointers to make sure everything goes smoothly:
- 🧑💻 These methods apply only to local accounts.
If you use a Microsoft Account to sign in, you’ll need to switch to a local account first.
How to check if you’re using a local or Microsoft account:
- Go to Settings → Accounts → Your Info
- If it says Microsoft account, you’ll need to switch to a local account via the same menu (click “Sign in with a local account instead”).
❓ FAQ: Changing Usernames on Windows 11
Q: Can I change the username of a Microsoft account using these methods?
No. These methods only apply to local accounts. To change the name on a Microsoft account, visit account.microsoft.com.
Q: Will changing my username affect my files or apps?
No, changing your username won’t delete any files or installed apps. However, folder names inside C:\Users\ may still show the old username unless manually changed (which requires extra caution).
Q: Which method is the safest for beginners?
Method 3 (User Accounts Panel) is the most beginner-friendly. Use Terminal only if you’re comfortable with commands.
🎉 Wrap Up
And there you have it! You now know three effective methods to change your username in Windows 11 for local accounts:
- Method 1: Using Terminal/PowerShell
- Method 2: Local Users and Groups (for Pro/Enterprise)
- Method 3: User Accounts Panel (netplwiz)
Pick the method that best suits your comfort level and Windows edition. Changing your username not only helps personalize your system but also brings a bit of fresh energy to your workflow.
Thanks for reading. Stay curious, stay creative—and as always, stay Passionate About Tech!
Tags: windows 11 username change, rename local user, change account name windows 11, windows terminal rename, netplwiz, windows 11 pro tricks, user account settings, windows 11 local account
Hashtags:
#Windows11 #UsernameChange #TechTutorial #LocalAccount #WindowsTips #MicrosoftWindows #RenameUser #PowerShellTips
🔗 Helpful Links:
👉 Manage Windows User Accounts – Microsoft
👉 Switch to a Local Account – Microsoft


