If you’re tired of the default font on your Windows 11 or 10 and want to give your PC a personalized touch, changing the font is an easy way to start. This guide will walk you through the steps to customize your system font quickly and efficiently.
Step-by-Step Guide to Change the Font in Windows 11/10
Step 1: Create a New Text Document
The first step in changing your system font is to create a registry file. Here’s how:
- Right-click on the desktop and select New > Text Document.
- Open the newly created text document.
Step 2: Prepare the Font Change Code
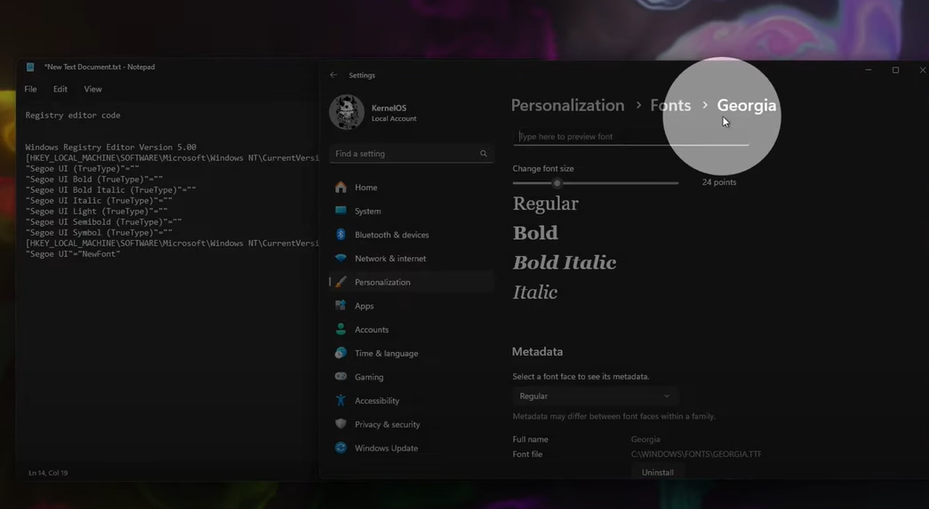
To change the font, you need to paste a specific code into the text document. Copy the following text and paste it into your newly opened text document:
Windows Registry Editor Version 5.00

[HKEY_LOCAL_MACHINE\SOFTWARE\Microsoft\Windows NT\CurrentVersion\Fonts]
"Segoe UI (TrueType)"=""

[HKEY_LOCAL_MACHINE\SOFTWARE\Microsoft\Windows NT\CurrentVersion\FontSubstitutes]
"Segoe UI"="New Font"
In this code, New Font is the placeholder that you will replace with the name of the font you want to use.
Step 3: Choose Your Desired Font
Now, it’s time to pick the font you’d like to use:
- Right-click on the desktop again and select Personalize.
- Scroll down and click on Fonts. Here, you will see all the fonts installed on your computer.
- Browse through the list and select the font you like. For example, if you choose “Georgia,” take note of the exact font name because you’ll need to replace it in the code.
Step 4: Replace the Font Name in the Code
Now that you’ve selected your font, it’s time to replace the placeholder text “New Font” in the code:
- Replace New Font with the name of the font you chose. For example, if you selected “Georgia,” the line would look like this:
"Segoe UI"="Georgia"
Step 5: Save the File as a .reg File
Next, you need to save the document as a .reg file so it can modify the system registry.
- Click File > Save As.
- In the File name box, enter a name followed by
.reg. For example, you can name it FontChange.reg. - Save it to your desktop or any other easily accessible location.
- In the Save as type dropdown, select All Files before saving.
Step 6: Apply the Registry File
Now, it’s time to apply the new font to your system:
- Navigate to where you saved the .reg file on your desktop.
- Double-click the file and a prompt will appear asking if you want to make changes to the registry. Click Yes.
- After this, restart your computer for the changes to take effect.
Step 7: Restart Your PC
The final step is to restart your PC for the font change to apply across the system.
- Click on the Windows button, select Restart, and allow your PC to reboot. Once restarted, you’ll see the new font displayed throughout Windows.
Conclusion
Changing the font in Windows 11 or 10 is a simple but effective way to personalize your computer. With a few quick steps—creating a registry file, selecting a new font, and applying the change—you can enjoy a more customized interface. If you ever want to revert back to the original font, you can create another .reg file or reset the settings in Windows.
#Windows11 #Windows10 #FontChange #Personalization #TechGuide #WindowsTips #Customization