Imagine having a 24/7 team member who never sleeps, instantly responds to customer queries, and stays polite and helpful—every time. Sounds too good to be true? It’s not. With Make, you can build a no-code AI agent that takes care of repetitive tasks like replying to emails, retrieving FAQs, and even sending custom replies—completely on autopilot.
In this article, we’ll walk you through how to create your own AI customer support agent using Make and open-source AI models. Whether you run a small eCommerce shop or manage client queries for a service business, this tutorial will help you automate your customer communication—step by step.
What You’ll Need:
- A free account on Make
- A free API key from Grok.com
- Your FAQ data in a Google Doc (or another supported data source)
- A Gmail (or Outlook) account for sending emails
- A Tally form or other customer inquiry form
Step 1: Create Your AI Agent in Make
- Sign Up at Make
Go to Make.com and create a free account. You’ll get one month of pro plan access with 10,000 operations—perfect for experimenting. - Access the AI Agents Panel
On the Make dashboard, click “AI Agents” from the sidebar, then select “Create Agent”. - Connect to an AI Model
- Choose a connection type: we recommend Grok because it supports high-performance, open-source models like Meta’s Llama-3 for free.
- Enter your Grok API key (you can generate one from the Grok dev console).
- Name Your Agent
Give your AI a relevant name. Example: Customer Service Agent. - Select an AI Model
- Use Llama-3-70b for balanced speed and accuracy.
- This model is great for writing clear, helpful customer responses.
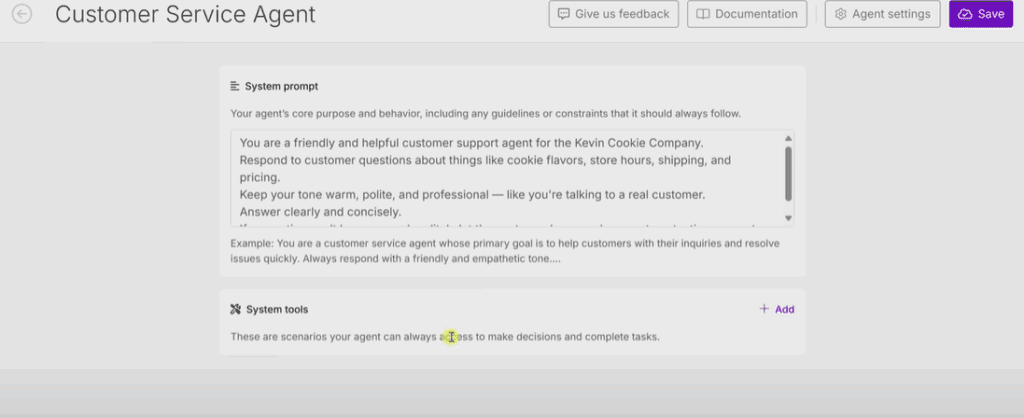
- Write a System Prompt
This prompt is like your AI’s job description. Example: You are a friendly and helpful customer service agent for the Kevin Cookie Company. Answer questions about cookie flavors, store hours, shipping, and pricing. Use a warm, polite, and professional tone. If you don’t know the answer, suggest contacting support. - Save the Agent
Once the system prompt is set, hit Save.
Step 2: Add Tools – Give Your Agent Information
To be useful, your AI needs data—like your product FAQ. Here’s how to give it access:
A. Connect Google Docs as a Data Source
- Go to “Scenarios” in Make.
- Click “Create New Scenario”.
- In the visual editor, click the plus (+) button to add a module.
- Search for Google Docs and select “Get content of a document”.
- Connect your Google account and choose your FAQ document.
- Save this scenario.
B. Return Output for AI Use
- Add another module and search for “Scenarios” → “Return Output”.
- Define an output structure:
- Name:
KCC_FAQ - Description: “Kevin Cookie Company’s FAQ data”
- Type:
Text
- Name:
- Choose the full document content as the output.
- Run the scenario once to confirm it works.
- Rename it to something like Kevin Cookie Company FAQ and set the schedule to “On Demand”.
- Activate and save the scenario.
Step 3: Add the FAQ Tool to Your Agent
- Return to AI Agents in Make.
- Click “Configure” next to your agent.
- Scroll to System Tools → Add.
- Select the FAQ scenario you created.
- Add a description, e.g.: Retrieves the Kevin Cookie Company’s FAQ from a Google Doc. Includes info like store hours, pricing, and cookie flavors.
- Check the box and click Add, then Save.
Step 4: Enable Email Replies via Make
Let’s enable your AI to send customer emails.
A. Build the Email Tool Scenario
- Go to Scenarios and create a new one.
- Define three inputs:
- Customer Email Address
- Email Subject
- Email Content
- Add a module for sending email (choose Gmail, Outlook, or SMTP).
- Map the inputs to the email fields (To, Subject, Body).
- Name the scenario (e.g., Send Email Replies to Customers).
- Set schedule to On Demand, then Activate and Save.
Step 5: Automate Responses Based on Form Submissions
Let’s connect everything using your customer contact form.
- Create a new scenario.
- Add a module for Tally → Watch for new responses.
- Select your Tally form.
- Add a module for Make AI Agents → Run Agent.
- Choose your AI agent and ensure it has access to the FAQ tool.
- Map the Tally inputs (name, email, question) into a prompt for the agent.
- Add a module to send email, using the reply from the AI agent.
You’re Done!
Now, every time a customer submits a question through your form, the AI agent:
- Reads the question
- Looks up info from the FAQ
- Generates a polite and relevant response
- Emails it directly to the customer
No manual work required. Just smart, automated support that’s always ready to help.
Final Thoughts
Setting up an AI agent with Make is surprisingly simple and incredibly powerful. It brings the capabilities of AI to your business workflows without needing any code. Whether it’s handling FAQs, sending replies, or connecting with apps like Notion or CRMs, you can extend your AI to do even more.
So go ahead—let your new AI teammate handle the inbox while you focus on growing your business.
Tags:
AI, automation, customer support, no-code tools, Make.com, Grok, Llama 3, Google Docs, email automation, AI agent, customer service, Tally forms, Gmail integration, small business tools, chatbot setup


Hashtags:
#AI #CustomerSupport #Automation #NoCode #MakeCom #Llama3 #EmailAutomation #AIForBusiness #GrokAI #SmallBusinessTools


