Are you a Windows 11 user who admires the sleek and minimalistic design of macOS? Would you love to give your Windows PC a Mac-like makeover, complete with a glass-like effect that brings modern elegance to your desktop? In this guide, we will walk you through the detailed steps to transform your Windows 11 interface into a visually stunning macOS-style theme with a glass effect. Let’s get started!
Why Apply a Mac Theme with Glass Effect on Windows 11?
The macOS interface is known for its simplicity, fluid animations, and transparency effects. It gives a polished, futuristic appearance that many users love. Windows 11 already has a visually appealing design with rounded corners, subtle shadows, and a centered taskbar. However, for users who desire the iconic macOS aesthetic, applying a Mac theme with a glass effect is an excellent way to blend the best of both worlds.
By following the steps below, you can achieve a macOS-like appearance, including a dock, transparent window effects, and the glassy design that defines Apple’s interface.
Step-by-Step Guide to Apply a Mac Theme with Glass Effect on Windows 11
1. Backup Your System
Before making any changes to your system’s appearance, it’s always a good idea to create a backup or a system restore point. This ensures that you can easily revert back to the original settings in case something doesn’t work as expected.
- Press Windows + S, type “Create a restore point” and select the result.
- In the System Protection tab, select your system drive (usually C:) and click Create.
- Name the restore point and click Create again to confirm.
2. Install macOS Theme Pack for Windows 11
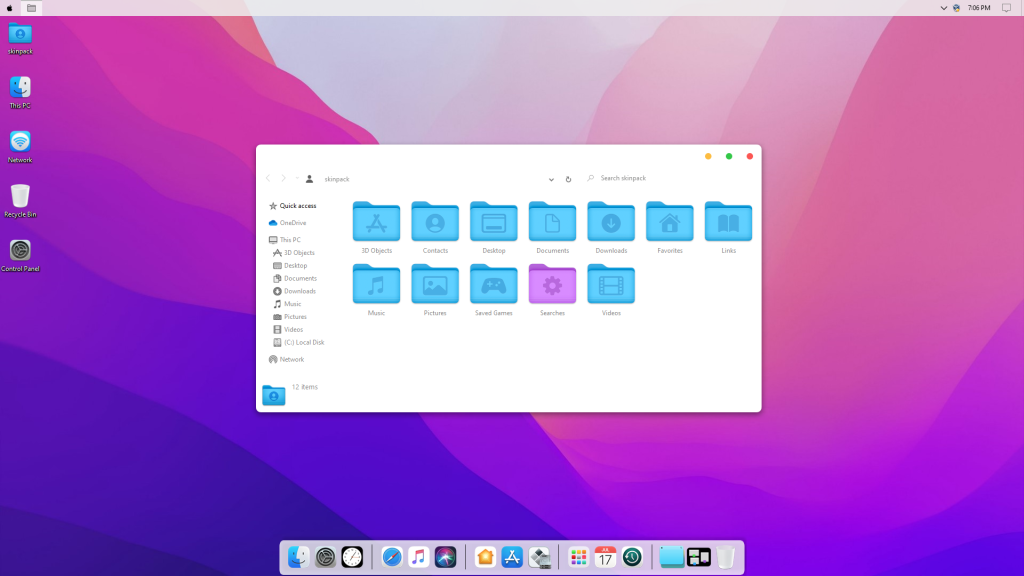
To transform your Windows 11 into a Mac-inspired theme, you’ll need a reliable macOS theme pack. One popular option is macOS Big Sur Skin Pack or macOS Monterey Skin Pack, which includes the icons, taskbar, dock, and visual elements that replicate macOS.
- Download a trusted macOS theme pack from a site like SkinPacks or DevianArt.
- Install the theme by following the installer’s prompts. Be cautious and only download from reputable sources to avoid malware.
3. Install macOS Dock (Use RocketDock)
Windows does not come with a dock by default, but you can add one that mimics the Mac dock using RocketDock. RocketDock is a popular application launcher that sits at the bottom of the screen like the macOS dock.
- Download RocketDock from its official website.
- Install the application and open it. You can configure its size, position, and behavior to match the look of the Mac dock.
- To enhance the appearance, download macOS-style icons from online resources like IconArchive or DeviantArt and replace the default ones in RocketDock.
4. Enable Glass Effect (Using TranslucentTB and Glass8)
The glass effect on macOS is one of its most striking features, adding transparency and smooth transitions to windows and menus. Here’s how you can achieve this look on Windows 11:
a) Use TranslucentTB to Make Taskbar Transparent
- Download and install TranslucentTB from the Microsoft Store or GitHub.
- After installing, open the application and adjust the taskbar transparency settings. You can choose between various styles such as Normal, Blurred, Clear, and Acrylic to mimic the glassy macOS look.
b) Use Glass8 for Window Transparency
- Download Glass8 (also known as Aero Glass) from its official website.
- This utility brings back the Aero glass effect from older versions of Windows, giving you transparency in the window borders.
- Install Glass8 and configure the settings to get the level of transparency and blur you prefer.
5. Apply macOS Icons
To complete the Mac-like experience, you need to change the default Windows 11 icons to macOS-style icons.
- Download macOS icons from a resource like IconArchive or DeviantArt.
- To change icons, right-click on a folder or shortcut, select Properties, then go to the Customize tab.
- Click Change Icon and browse to the location of your downloaded macOS icons. Select the icon you want and apply the changes.
6. Apply macOS Fonts
To really complete the look, you can install San Francisco, the default font used in macOS.


- Download the San Francisco font from an online resource.
- Install it by double-clicking on the downloaded font file and clicking Install.
- Use a tool like WinAero Tweaker to apply the font across the system in place of the default Windows font.
7. Customize System Sounds
macOS has its own unique system sounds. You can replace Windows sounds with macOS sounds by downloading sound packs and manually changing them in Sound Settings.
- Go to Settings > Sound > Advanced sound options.
- Under Program Events, click on each event and replace it with the corresponding macOS sound file.
8. Use macOS Wallpapers
To truly replicate the Mac environment, download high-resolution macOS wallpapers.
- Visit websites like Unsplash or WallpaperAccess to find the latest macOS Big Sur or Monterey wallpapers.
- Right-click on your desktop, select Personalize, and set the downloaded wallpaper as your background.
Conclusion
Transforming your Windows 11 PC to resemble macOS with a sleek glass effect is an exciting way to customize your user interface. By following these steps, you’ll enjoy the aesthetic beauty of macOS on the reliable framework of Windows. This hybrid experience offers the best of both operating systems, giving you the clean design of macOS without sacrificing the flexibility of Windows.
If you ever want to revert back to the default Windows theme, simply uninstall the skin packs and dock applications or restore your system using the backup created earlier.


