Adding images to your design projects in Adobe InDesign is essential for creating visually engaging layouts. Whether you’re designing brochures, posters, or books, InDesign makes it easy to insert and manipulate images within your documents. This article provides a detailed guide on how to add an image and adjust it for a perfect fit.
Step 1: Create a New Document
- Open Adobe InDesign and create a new document.
- Go to File > New > Document or use the shortcut Ctrl+N.
- Configure the document settings (such as size and margins) according to your project requirements, then click OK.
Step 2: Use the Rectangle Frame Tool
- In the Tools Panel, select the Rectangle Frame Tool (shortcut F).
- Click and drag to draw a frame where you want the image to appear.
- The size of the frame doesn’t need to be exact at this stage, as you can resize it later.
Step 3: Place an Image
- With the frame selected, press Ctrl+D to open the Place dialog box.
- Browse your computer to find the image you want to insert.
- Select the image and click Open.
- The image will appear inside the frame.
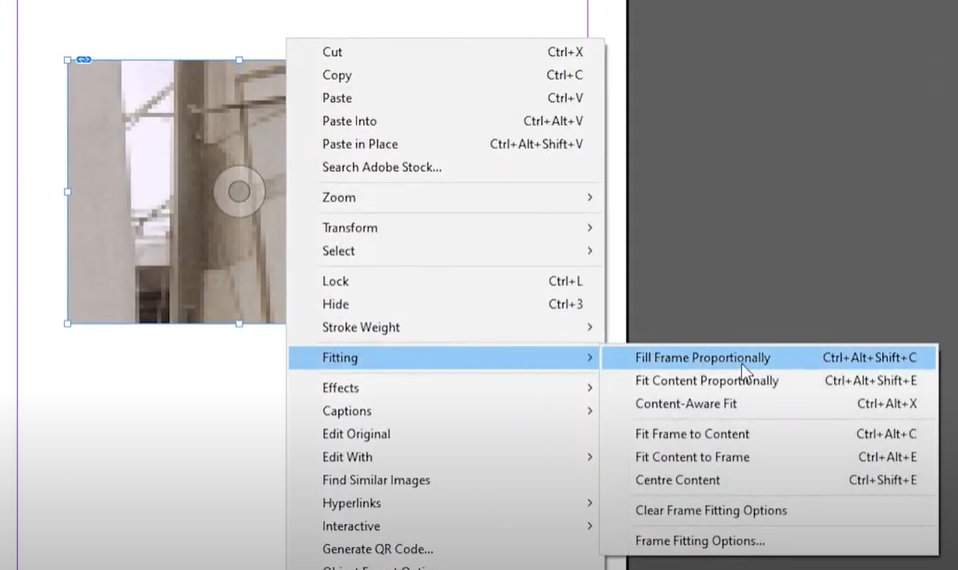
Step 4: Fit the Image to the Frame
- To fit the image within the frame proportionally, right-click on the image and choose Fitting > Fill Frame Proportionally.
- Alternatively, use the keyboard shortcut Ctrl+Alt+Shift+C for quick fitting.
- This action ensures that the image fills the frame while maintaining its original proportions, without distortion.
Step 5: Adjust the Frame and Image
- Resizing the Frame:
- Click on the edges of the frame and drag to resize it as needed.
- Repositioning the Image:
- Double-click inside the frame to select the image directly.
- Use the arrow keys or drag the image to adjust its position within the frame.
- Reapplying the Fit:
- After making adjustments, you can reapply the Fill Frame Proportionally option to ensure the image aligns well with the resized frame.
Tips for Working with Images in InDesign
- Using High-Resolution Images: Ensure the image you insert is of high quality to maintain clarity in your final design.
- Frame Borders: Add a stroke or border to the image frame if it suits your design. You can do this from the Stroke Panel.
- Transparency Effects: Apply transparency or blending effects to the image for creative designs. Use the Effects Panel for these adjustments.
Conclusion
Adding images to your InDesign document is a simple yet powerful way to enhance your layouts. By following these steps, you can easily insert, adjust, and fit images to your frames. Experiment with different frame sizes and image positions to create a professional and visually appealing design.
We hope this guide helps you master image placement in InDesign. If you have any additional tips or questions, feel free to share them in the comments!
#InDesign #AdobeInDesign #ImagePlacement #GraphicDesign #InDesignTutorial #LayoutDesign #DesignTips #ImageFitting #CreativeDesigns #InDesignBasics

