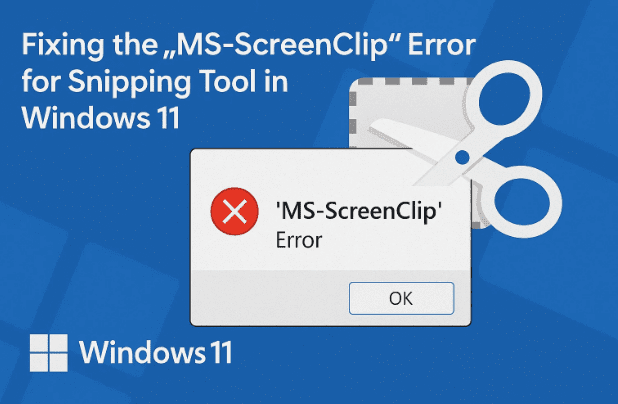
If you’ve tried to take a quick screenshot in Windows 11 and been hit with a mysterious “MS Screen Clip” error (often triggered by the Win + Shift + S shortcut), take a breath—you’re not alone, and this is fixable. In this article, we’ll walk patiently through the exact steps that usually resolve it, explain why those steps work, and add extra solutions for the stubborn cases. We’ll also include safety notes, answers to common questions, and some “nice-to-have” tweaks that make screenshotting smoother once things are back on track.
Before we dive into the fixes, a quick clarification: the correct app name is Snipping Tool (not “Snapping Tool”). And “MS Screen Clip” refers to a Windows URI link type—specifically ms-screenclip:—that should be associated with Snipping Tool. When that association breaks or points to the wrong place, Windows tries to launch a tool it can’t find or isn’t allowed to use, and you see the error.
Official software pages (for reference only):
• Microsoft Snipping Tool (support & product info): https://support.microsoft.com/windows
• Windows 11 Settings (overview & help): https://support.microsoft.com/windows
(We’re linking to Microsoft’s support site because app store URLs and app package names can vary by build. If you prefer the Microsoft Store, open it and search for “Snipping Tool.”)
What You’ll Learn (and Why It Matters)
Let’s set expectations. We’ll start with the fastest, lowest-risk fix—the one that directly matches your provided steps (setting the default app for the ms-screenclip link type). Then, if that doesn’t fully solve it on your PC, we’ll escalate calmly through additional remedies: repairing or resetting the app, reinstalling, re-mapping shortcuts, checking for conflicts with other screenshot tools, and finally some system-level health checks.
We’ll also add short intro paragraphs before each section—so you’ll know exactly what we’re trying to achieve and whether it applies to you. If anything sounds risky (like editing the registry), we’ll provide a warning and an easier alternative.
Sound good? Great—so far, so good. Let’s get you snipping again.
TL;DR (Quickest Fix First)
If you just want the bare minimum:
- Settings → Apps → Default apps → Choose defaults by link type
- Search for
ms-screenclip. - Make sure the handler (default app) is Snipping Tool. If it isn’t, click it and set Snipping Tool.
- Try Win + Shift + S again or open Snipping Tool and choose a new snip.
If that works, wonderful. If it doesn’t (or if you want the full explanation and extra fixes), keep reading—we’ll go step by step.
Why This Error Happens (Plain English)
Let’s make sense of the moving parts:
- Snipping Tool is the Windows app that handles screenshots and snips.
ms-screenclip:is a special type of link (a URI scheme) Windows uses to trigger the snipping UI.- If Windows doesn’t know that Snipping Tool should handle
ms-screenclip:, or if the Snipping Tool app is corrupted, disabled, or replaced by another program, your snip won’t start.
With that in mind, our first step is to restore the correct association. Then we’ll verify the app itself is healthy, that your shortcut is mapped, and that nothing else is hijacking the behavior.


Step 1 — Re-Associate the ms-screenclip: Link Type with Snipping Tool
Before jumping into repairs, we’ll simply point ms-screenclip: back to Snipping Tool. This is exactly the fix outlined in your original steps, with a bit more context so you know why it works.
What we’re doing: telling Windows, “Whenever something calls ms-screenclip:, open Snipping Tool.”
How to do it:
- Open Start → click Settings (the gear icon).
- Go to Apps → Default apps.
- Scroll and click Choose defaults by link type (it’s near the bottom).
- In the search bar, type
screencliporms-screenclip. - Click the result for
ms-screenclip:. - If Snipping Tool isn’t selected, click the current app and change it to Snipping Tool.
- Click Set default if prompted.
Try it now: Press Win + Shift + S or open Snipping Tool and click New. If it works, you’ve likely fixed the core problem. If not, no worries—let’s keep going.
Step 2 — Repair (or Reset) the Snipping Tool App
Sometimes the association is fine but the app installation is damaged. Windows lets you repair or reset Store apps individually. We’ll try Repair first because it doesn’t remove your app data.
What we’re doing: re-healing the Snipping Tool app files without changing your personal settings (Repair), or returning it to factory defaults (Reset).
How to do it:
- Settings → Apps → Installed apps.
- Search for Snipping Tool.
- Click the … (three dots) next to it → Advanced options.
- Scroll to find Repair and click it.
- When it finishes, test Win + Shift + S.
- If it still fails, return to the same screen and choose Reset (this may clear app-specific preferences).
- Test again.
Note: If you don’t see Snipping Tool here, skip to Step 3—you may need to reinstall it.
Step 3 — Reinstall Snipping Tool (Microsoft Store)
If Repair/Reset doesn’t do it, a clean reinstall usually does. There are a couple of ways, but the simplest is via the Microsoft Store.
What we’re doing: installing a fresh copy of the app so all files are current and intact.
How to do it:
- Open Microsoft Store.
- Search for Snipping Tool.
- Click Install or Get (if it’s not installed), or Update (if an update is available).
- After install/update, try Win + Shift + S.
Still no luck? Don’t worry—we’re going to check the keyboard shortcut mapping next.
Step 4 — Re-Map the Print Screen Key (Optional but Helpful)
Windows 11 includes an option to use the Print Screen key to open Snipping Tool. This doesn’t fix ms-screenclip: directly but provides a reliable fallback, and sometimes toggling this on/off resets the system behavior.
What we’re doing: enabling (or toggling) a built-in shortcut so you have another way to trigger Snipping Tool.
How to do it:
- Settings → Accessibility → Keyboard.
- Find Use the Print Screen button to open Snipping Tool and turn it On.
- Press PrtScn and confirm Snipping Tool opens.
- (Optional) Toggle it Off, restart, then On again—this can nudge Windows to refresh related settings.
If Win + Shift + S still shows the error, a conflicting app might be intercepting the shortcut or the screen capture surface. Let’s check that.
Step 5 — Check Conflicts with Other Screenshot Tools
Here’s a common culprit: third-party utilities like OneNote’s Clipper, Dropbox “Save screenshots to Dropbox”, ShareX, Lightshot, Greenshot, vendor overlays, or even graphics driver overlays can intercept global hotkeys.
What we’re doing: ensuring no other app is grabbing the same shortcut or blocking the snipping surface.
What to check:
- OneNote: Open OneNote’s settings and disable the screen clipping shortcut or change it.
- Dropbox: Preferences → Backups or Import tab → turn off “Share screenshots using Dropbox” / “Save screenshots to Dropbox.”
- ShareX / Lightshot / Greenshot: Open each app’s Hotkey settings and either disable or reassign Win + Shift + S and PrtScn.
- NVIDIA/AMD overlays (GeForce Experience, Radeon Software), Xbox Game Bar, or Steam overlay: temporarily disable overlays to test.
- Microsoft PowerToys: If Screen Ruler or FancyZones hotkeys overlap, adjust them.
After disabling anything suspicious, restart your PC and test Win + Shift + S. If it now works, re-enable tools one by one with different shortcuts so they don’t clash.
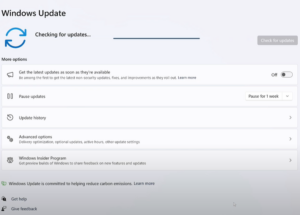
Step 6 — Update Windows 11 (Bug Fixes & Certificates)
Snipping Tool has, in the past, been affected by system-level issues (including a now-famous expired certificate incident early in Windows 11’s life). Keeping Windows current ensures you have the latest bug fixes and security components.
What we’re doing: ensuring your OS components (including the Store framework and screenshot surface) are up to date.
How to do it:
- Settings → Windows Update.
- Click Check for updates.
- Install everything offered (especially Cumulative Updates).
- Restart the computer and test again.
Step 7 — Run System Health Checks (SFC & DISM)
If system files related to built-in apps or frameworks are corrupted, Snipping Tool might malfunction. Two built-in tools help fix that: SFC and DISM.
What we’re doing: scanning and repairing Windows system files and component store corruption.
How to do it (run in this order):
- Open Start, type cmd, right-click Command Prompt, choose Run as administrator.
- Run:
sfc /scannowWait for it to finish. - Then run:
DISM /Online /Cleanup-Image /RestoreHealth - When done, restart and test Win + Shift + S again.
Note: These commands are safe. They don’t remove your personal files; they repair Windows’ system components.
Step 8 — (Advanced) Group Policy & Registry Checks
We’re almost at the bottom of the toolbox. On some corporate or Pro/Enterprise setups, a policy may block Snipping Tool. There’s also a registry mapping for the ms-screenclip: handler. If you’re not comfortable here, feel free to skip to the FAQ—the steps above solve it in most cases.
A) Group Policy (if available on your edition):
- Press Win + R, type
gpedit.msc, press Enter. - Navigate to (paths can differ by build):
User Configuration → Administrative Templates → Windows Components → Tablet PC → Accessories - Look for a policy like “Do not allow Snipping Tool to run”.
- Set it to Not Configured or Disabled (meaning allow Snipping Tool).
- Close Policy Editor and restart.
If you don’t find that policy path (Windows evolves), search within the editor for Snipping Tool. If the policy exists and is Enabled, that’s likely your issue.
B) Registry sanity check (experienced users only):
⚠️ Caution: Editing the registry can render Windows unstable if you change the wrong thing. Back up the registry first (File → Export) and proceed only if you’re comfortable.
- Press Win + R, type
regedit, press Enter. - Examine (do not blindly change) the following key (if present):
HKEY_CLASSES_ROOT\ms-screenclipYou should see subkeys likeshell\open\commandthat point to Snipping Tool. - If this mapping looks missing or obviously wrong, do not guess values. Instead, reinstall Snipping Tool (Step 3) and reassign
ms-screenclip(Step 1). Those supported steps are safer than manual registry edits.
Nice-to-Have Tweaks Once It’s Working Again
We’ve made great progress. Let’s add a few quality-of-life improvements so future you has an even smoother experience.
A) Choose Where Snips Go
By default, Win + Shift + S copies to the clipboard and shows a notification to edit/save. If you prefer immediate saves:
- Open Snipping Tool → Settings (gear icon).
- Explore options such as Auto copy to clipboard, Multiple windows, Prompt to save, and Save location behavior.
B) Clipboard History (so you don’t lose a snip)
Turn on Windows Clipboard History to keep several items (including images):
- Settings → System → Clipboard → Clipboard history → On.
- Press Win + V to see your recent copied items.
C) OneDrive Screenshots (optional)
If you want all screenshots automatically saved to the cloud:
- Right-click OneDrive icon → Settings → Sync and backup (or Backup) → enable Save screenshots I capture to OneDrive.
- Note: This can “steal” the Print Screen behavior; if you later hit issues, try turning this off temporarily to test.
Frequently Asked Questions (Clear, Quick Answers)
Q1) What does the “MS Screen Clip” error actually mean?
A: It indicates the link type ms-screenclip: didn’t successfully launch its handler (Snipping Tool). Either the association is broken, the app is damaged, or another tool blocked the request.
Q2) Is it “Snapping Tool” or “Snipping Tool”?
A: Snipping Tool (official Microsoft app). If you see “Snapping,” that’s just a mix-up; the correct name is Snipping Tool.
Q3) Why does Win + Shift + S sometimes do nothing?
A: It can be overridden by third-party tools, blocked by policy, or the handler is mis-assigned. Follow Steps 1 (association), 5 (conflicts), and 6–7 (updates & repairs).
Q4) Will Repair or Reset delete my saved screenshots?
A: Repair won’t touch your data. Reset returns the app to defaults; it doesn’t delete files you already saved, but it may clear app-specific settings.
Q5) Is there a keyboard shortcut for a full screen capture?
A: In the snipping overlay, choose Rectangular, Freeform, Window, or Fullscreen mode. You can also bind Print Screen to open Snipping Tool (Step 4).
Q6) Can I set Snipping Tool to always save to a folder automatically?
A: By default it copies to clipboard and prompts to save. You can use OneDrive’s screenshot setting for automatic saving or use third-party tools if you need more advanced auto-save workflows.
Q7) I’m on a work laptop. Could my company block Snipping Tool?
A: Yes. Group policies can disable it. Check with your IT team or review Step 8A if you have access to the Group Policy Editor.
Q8) Why does the Microsoft Store page for Snipping Tool look different on my PC?
A: The Store may display different packaging or versions depending on your build and region. Using Settings → Windows Update and Store → Library → Get updates keeps everything aligned.
Q9) Does the old “Snip & Sketch” matter in Windows 11?
A: Windows 11 rolled features from Snip & Sketch and the classic Snipping Tool into the modern Snipping Tool. Some system references or package names may still mention the older name, but the app you interact with is Snipping Tool.
Safety Notes & Disclaimer
- Proceed carefully with Group Policy and Registry changes. If you’re not sure, prefer reinstalling Snipping Tool and re-assigning the
ms-screenclip:link via the supported UI. - Keep Windows up to date; many “random” app issues are resolved by cumulative updates.
- This article is for general informational purposes on Windows 11 desktop usage. Organizational policies, system images, or security baselines in enterprise environments may override some steps—consult your IT administrator if you’re on a managed device.
Final Thoughts (You Did Great)
We covered a lot: associations, app health, shortcuts, conflicts, updates, and system integrity. If you take nothing else from this article, remember: ms-screenclip: must point to Snipping Tool, and no other tool should hijack your shortcut. With those two conditions true, Snipping Tool in Windows 11 is typically rock-solid.
If something still isn’t right after working through these steps, tell me exactly where things diverged (e.g., “ms-screenclip: didn’t appear in link types,” “Reset was greyed out,” or “Win + Shift + S works only in a new user account”). Those details help pinpoint the next best move without guesswork.
Happy snipping!
Tags
windows 11 snipping tool fix, ms screen clip error, ms-screenclip association, win shift s not working, snipping tool repair reset, reinstall snipping tool, screenshot conflicts onenote dropbox, print screen mapping, sfc dism windows, windows screenshot troubleshooting
Hashtags
#Windows11 #SnippingTool #Screenshot #Troubleshooting #HowTo #Productivity #Microsoft #WinShiftS #TechTips #FixIt


