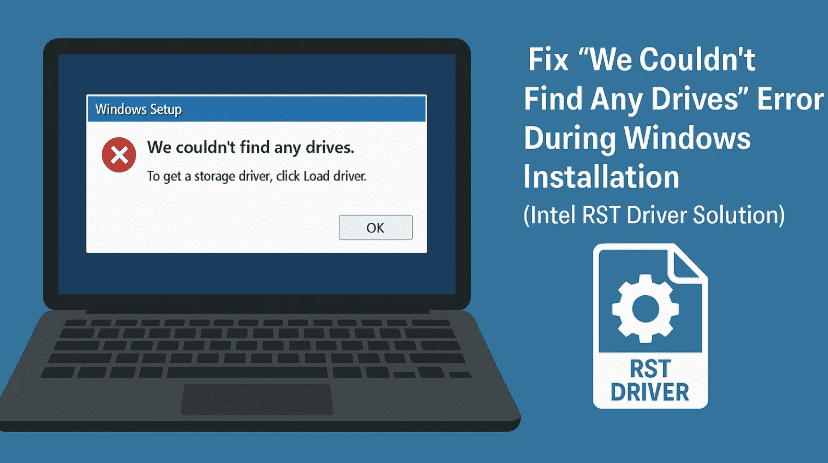
Getting the dreaded “We couldn’t find any drives. To get a storage driver, click Load driver” error while installing Windows 10 or 11?
This frustrating issue typically appears on newer laptops and desktops — especially those with Intel 10th generation or newer processors — because the Windows installer is missing the Intel Rapid Storage Technology (RST) driver required to detect modern storage devices.
But don’t worry — in this article, we’ll walk you through two proven methods to fix the issue step-by-step using a USB flash drive.
Let’s move to the first method and get your storage drives to show up during Windows installation.
🧰 What You’ll Need
- A working Windows PC with internet access
- A USB flash drive (8GB or more)
- Intel RST Driver
- Rufus (if creating a bootable USB) (optional)
🔧 Method 1: Extract Intel RST Driver and Load It During Installation
Let’s start with the official and most commonly successful method.
Step 1: Download Intel Rapid Storage Technology Driver
- Open your browser and search:
Intel Rapid Storage Technology driver - Click on the result from Intel’s official website. Or use this link:
🔗 Download Intel RST Driver - Choose the correct version:
- For Intel 10th–11th Gen CPUs, use the older version
- For Intel 12th–13th Gen CPUs, use the newer version
- Scroll down and download the
.exesetup file. - Once downloaded, move the file to your C: drive into a new folder called
rapid.
💡 You can name the folder anything, but keep it simple.
Step 2: Extract the Driver Files to Your USB Drive
Let’s now extract the driver contents using PowerShell.
- Plug your USB flash drive into the system.
- Open Windows PowerShell as administrator (search “PowerShell”, right-click → Run as administrator).
- Type the following command:
cd C:\rapid
.\SetupRST.exe -extractdrivers F:\RST
Replace
F:\with your USB drive letter.
- When prompted, the Intel RST installer will extract the drivers into a folder on your USB called RST.
Step 3: Load Driver During Windows Installation
Now you’re ready to use the USB to bypass the error during installation.
- Insert the USB into the PC where you are installing Windows.
- Start the Windows setup process.
- When you get the “We couldn’t find any drives” message, click Load driver.
- Click Browse, then navigate to your USB drive.
- Select the
RSTfolder → Click OK. - The driver will now load, and your storage drive should appear.
🎉 You can now proceed with the Windows installation as usual.
🔄 Method 2: Download Driver from Laptop or Motherboard Manufacturer
If Method 1 doesn’t work for your system, the issue may require a model-specific storage driver.


Step-by-step:
- On another working computer, open the Start Menu → Search System Information.
- Note down your Motherboard model (if desktop)
- Or the Laptop model name (found on a sticker or in Settings)
- Google search your model name along with the term
drivers.- Example:
Dell XPS 13 Intel RST driver
- Example:
- Visit your manufacturer’s official support site (e.g., Dell, HP, ASUS).
- Go to the Drivers & Downloads section.
- Under the Storage or SATA/RAID category, find Intel Rapid Storage Technology.
- Download the storage driver (usually comes in
.zipor.exeform). - Extract the contents into a folder on your USB flash drive.
Use the Extracted Driver During Windows Installation:
- Insert the USB into the system where you’re installing Windows.
- On the error screen, click Load driver → Browse.
- Navigate to the driver folder on your USB and click OK.
The setup will load the driver and detect your drive.
✅ Your drive should now appear, and you can proceed with installation.
🙋 Frequently Asked Questions (FAQs)
Q: Why does Windows show “We couldn’t find any drives” during install?
A: This typically means Windows doesn’t have the necessary storage driver — especially for modern Intel systems using RST or RAID storage modes.
Q: Can I switch from RAID to AHCI in BIOS instead?
A: Yes, switching storage mode from RAID to AHCI in BIOS can solve this — but it may cause boot issues if you change it on a system with an existing Windows installation.
Q: Do I need to do this every time I install Windows?
A: Only on systems where storage is controlled by Intel RST. Once Windows is installed and updated, it won’t be needed again.
⚠ Disclaimer:
This tutorial is intended for educational and troubleshooting use only. Always download drivers from official websites to avoid malware or corrupted files. Improper BIOS changes can affect system stability.
📌 Tags:
intel rst driver, windows installation no drives found, fix load driver windows 11, windows 10 storage driver missing, hdd not detected install windows, rapid storage technology driver
📢 Hashtags:
#Windows11 #Windows10 #IntelRST #DriverFix #WindowsInstallError #NoDrivesFound #TechGuide #StorageDriver
By following this guide, you’ve successfully fixed one of the most annoying issues during Windows setup. If this helped you, feel free to share this article with others who might run into the same problem.
Happy installing! 💻🛠️


