CorelDRAW is a powerful tool for graphic design, offering versatility for creating everything from business cards to large banners. In this article, we’ll walk you through understanding CorelDRAW’s interface and how to configure a workspace for your projects. If you’re new to CorelDRAW, this guide will help you get started confidently.
Understanding the CorelDRAW Interface
When you open CorelDRAW, you’ll encounter its Home Screen. The appearance may vary depending on the version of CorelDRAW you are using. In this guide, we’ll be using CorelDRAW X24, but the fundamentals remain consistent across versions.
The home screen includes various options for starting new projects, accessing recent files, and exploring learning resources. However, for now, we’ll focus on creating a new document.
Creating a New Document
There are two main ways to create a new document:
- Using the “New Document” Button:
- Look for the large “+ New Document” button on the home screen and click it.
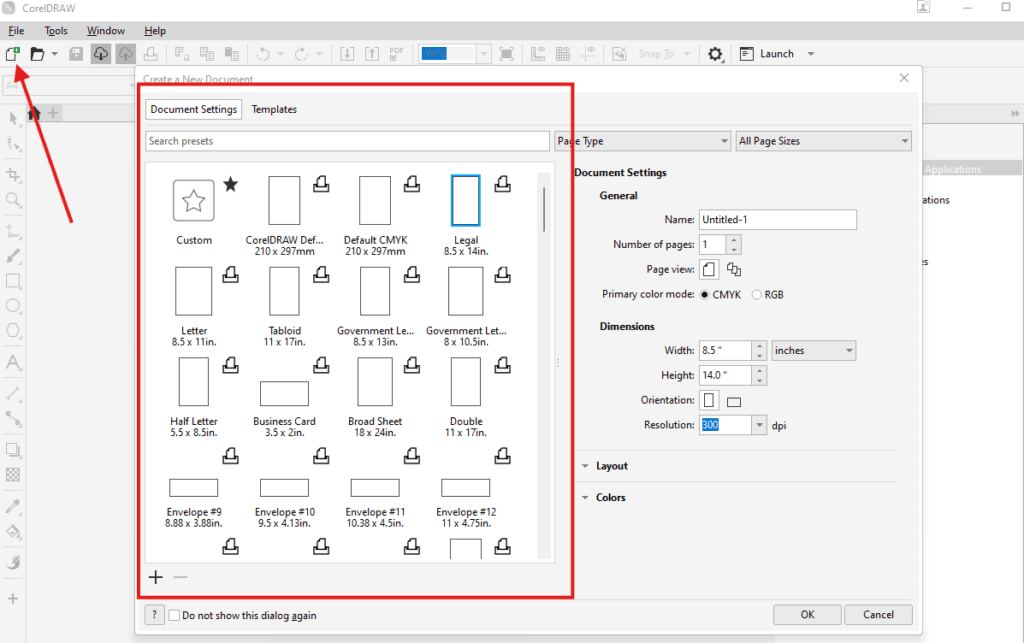
- Alternatively, you can click the blank page icon in the top-left corner of the screen.
- Configuring Your Document:
- Once you select “New Document,” a configuration window will appear. Here’s what you can set up:
- Document Name: Assign a name for easy identification. Example: “BusinessCard_Design”.
- Number of Pages: Select the number of pages for your project.
- Color Mode: Choose CMYK for print or RGB for digital designs. This is a crucial decision depending on your project’s purpose.
- Page Size: By default, the page size is set to A4. You can choose from other standard sizes like A3, Letter, or create a custom size.
- Orientation: Select Portrait (vertical) or Landscape (horizontal) based on your design.
- Resolution: Set the DPI (dots per inch). Use 300 DPI for high-quality prints or 72 DPI for web graphics.
- Once you select “New Document,” a configuration window will appear. Here’s what you can set up:
Click OK after configuring your settings to open the new document.
Adjusting Document Settings After Creation
You can modify most document settings even after opening a file:
- Changing Page Size:
- Go to the Property Bar at the top. Select your desired page size (e.g., A4, A3, or custom dimensions).
- Changing Color Mode:
- Navigate to Tools > Color Management > Document Settings to switch between RGB and CMYK.
- Custom Sizes:
- Use the dropdown menu in the Property Bar or enter exact dimensions (e.g., 9m x 3m for a billboard).
- Orientation:
- Toggle between Portrait and Landscape directly from the Property Bar.
Managing Multiple Documents in Tabs
CorelDRAW supports a tabbed interface, allowing you to work on multiple documents simultaneously. For example, you can design a business card in one tab and a brochure in another. Simply open a new document and switch between tabs as needed.
Tips for Working with CorelDRAW
- Using Scroll for Zooming:
- Scroll your mouse wheel to zoom in and out effortlessly.
- Experimenting with Page Layouts:
- Utilize the page layout options to create documents like visiting cards (9cm x 5cm) or flyers (15cm x 20cm).
- Save Frequently:
- Always save your progress regularly to avoid losing work due to unexpected issues.
Final Thoughts
Getting started with CorelDRAW involves familiarizing yourself with its interface and mastering the document setup process. With practice, you’ll discover the immense potential this software offers for your creative projects. Whether you’re designing for print or digital, CorelDRAW provides all the tools you need to succeed.
Tags and Hashtags
Tags: CorelDRAW tutorial, CorelDRAW basics, graphic design, CorelDRAW interface, CorelDRAW document setup, graphic design tips, digital design, print design, CorelDRAW features, CMYK vs RGB, CorelDRAW workspace.
Hashtags: #CorelDRAW #GraphicDesign #DesignTips #DocumentSetup #CMYK #RGB #CorelDRAWTutorial #PrintDesign #DigitalDesign


