In this article, we’ll explore how to create and manipulate a 5-sided polygon in CorelDRAW. While the 6-sided polygon is often preferred for symmetry and ease of centering, it is also possible to create intricate designs with a 5-sided polygon by using a few simple techniques. Below, we’ll walk through the step-by-step process to achieve this design, including tips on using CorelDRAW’s tools to make your project more refined and professional.

Step-by-Step Guide for Creating a 5-Sided Polygon Design in CorelDRAW
- Start with a 6-Sided Polygon:
- In CorelDRAW, begin by drawing a 6-sided polygon. This is because the 6-sided polygon is easier to manage and can later be converted into a 5-sided one.
- Hold down the Control button to ensure the polygon is perfectly symmetrical while drawing.
- Convert to a 5-Sided Polygon:
- Once your 6-sided polygon is drawn, you can change it into a 5-sided polygon.
- Select the polygon and go to the Properties Bar at the top of the interface, where you can change the number of sides from 6 to 5.
- The polygon will now be centered, and you can start your design.
- Create Curved Lines:
- To add some decorative curves, use the Three-Point Curve Tool. Start from a node on one side of the polygon and extend the curve past the opposite side.
- Repeat this process on all sides of the polygon to add symmetry and a fluid design.
- Duplicate and Rotate:
- Select your polygon and Control+D to duplicate it. After duplicating, rotate it by 72 degrees (since 360 divided by 5 is 72) to align perfectly with the original polygon.
- Continue duplicating and rotating the polygon to complete a circular pattern.
- Convert to Curves and Refine:
- Select the outer polygon and go to Object > Convert to Curves. This allows for further modification.
- Remove unnecessary nodes using the Shape Tool for a cleaner look. This will smooth out your design.
- Add Artistic Fills:
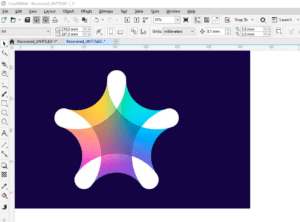
- Once your polygon is complete, you can fill specific areas using the Smart Fill Tool. For example, you can select certain sections of the polygon to fill with a gradient or solid color.
- Use the Interactive Fill Tool to create a gradient effect that gives a sense of depth. For a 3D look, apply a radial gradient by selecting Elliptical Fill in the fill options.
- Further Refinement with Clones:
- If you’d like to apply symmetry across multiple polygons, consider using the Clone Tool. This allows you to create uniform designs easily.
- Rotate these clones using Control+D and adjust their positions to ensure they align correctly.
- Final Adjustments:
- At this point, you can remove any extra guidelines or reference lines.
- Fill the background or individual shapes with colors using the Smart Fill Tool. Adjust gradients and shadows to enhance the design’s depth and dimension.
- Create a Unique Shape:
- You can experiment with this polygon design to create various effects. By manipulating the number of sides, curving lines, and using gradient fills, the possibilities are endless.
- Saving Your Work:
- Once you’re satisfied with your design, group the objects together (use Control+G). Save your work in CorelDRAW’s native format (.CDR) and export to other formats such as PNG or JPEG if needed.
Conclusion
By following these steps, you can easily create complex and interesting designs using a simple 5-sided polygon in CorelDRAW. This method provides a flexible approach to geometric design, allowing you to experiment with shapes, curves, and fills to create stunning artwork.
For further customization, try varying the number of sides or adding more intricate curves and artistic fills. CorelDRAW’s powerful tools make it easy to explore new design possibilities.

