CorelDRAW offers many versatile tools to create custom designs, including dotted or dashed lines. In this guide, we’ll walk you through the steps to create a dotted or dashed line on a circle, using the shape of the number “8” as an example. By following these instructions, you’ll learn how to manipulate curves, convert outlines to objects, and refine your design to get the look you want.
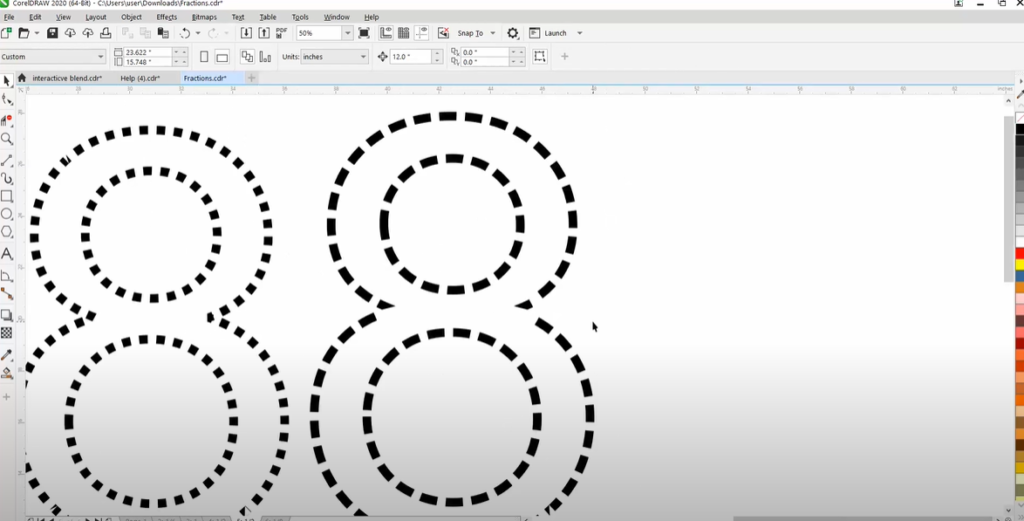
Step-by-Step Guide to Creating Dotted or Dashed Lines on a Number Eight
1. Create the Number Eight
- Begin by typing the number “8” using the Text Tool.
- Left-click to select the shape, and then right-click to bring up additional options.
2. Convert the Number to a Curve
- To make the number editable, convert it to a curve. Go to Object > Convert to Curves. This will allow you to manipulate the lines of the shape freely.
3. Break the Curve Apart
- Go to Object > Break Curve Apart to separate the upper and lower circles of the number eight. This enables you to edit each part of the shape individually.
4. Adjust the Nudge Factor
- Set your Nudge Factor to about 12 inches, or the value that works best for your canvas. Nudge one half of the eight away to give you room to work on each part.
5. Make Lines Thicker
- Select one of the parts of the eight and adjust its line thickness. Double-click on the line to bring up the properties bar. Increase the line thickness to 24 points for a bold outline.
6. Convert the Line to a Dotted Line
- With the line selected, go to the line properties and choose a dotted line style from the options. If you prefer, you can also do this by pressing F12 and choosing from the available line styles.
7. Apply the Same to Both Halves
- Repeat the process for the other half of the eight. Select the second half, set it to 24 points, and apply the same dotted line style.
8. Convert Outline to an Object
- For more control over the shape, you can convert the outline to an object. Go to Object > Convert Outline to Object. This makes the outline an editable shape, allowing you to manipulate its nodes directly.
9. Edit the Nodes
- Use the Shape Tool to fine-tune the look. Select the nodes you wish to edit, right-click, and choose Convert to Line to give them a straighter appearance. This is especially useful if you want to modify specific sections of the eight to create a balanced or symmetrical look.
10. Duplicate and Mirror the Shape
- For a more uniform design, you can break apart both halves of the eight and manipulate them individually. Use Control + D to duplicate one half, and then mirror it using the Mirror tool. Position the duplicate next to the original, holding Control to align it properly.
11. Finalize Your Design
- Once you are satisfied with the dotted line look, group the objects together by selecting everything and pressing Control + G.
- If needed, adjust the overall size or proportions by scaling the shape uniformly.
Conclusion
By following these steps, you can create smooth, custom dotted or dashed lines for any shape, including the number eight. CorelDRAW’s flexibility with curves, nodes, and outlines gives you precise control to perfect your designs.
#CorelDRAW #DottedLine #DashedLine #DesignTips #VectorArt #LineSmoothing #CurveEditing #CorelTricks #GraphicDesign #DrawingTools #DigitalArt #ObjectManipulation
Visited 136 times, 1 visit(s) today
