Ensuring that your PDF files are print-ready and maintain their intended appearance is crucial when delivering files to clients or prepress. One of the key steps in preparing a PDF for printing is converting all text to outlines, preventing any font-related issues. This process ensures that the text is treated as vector shapes rather than editable text, preserving the design integrity regardless of the recipient’s system. In this blog, we’ll focus on using Adobe Acrobat Pro’s Preflight tool to convert text to outlines effectively.
Why Convert Text to Outlines?
- Font Consistency: Outlined text appears consistently across all devices and systems, regardless of whether the necessary fonts are installed.
- Avoid Font Licensing Issues: By not embedding fonts, you eliminate potential licensing conflicts.
- Prevent Editing: Once text is outlined, it cannot be easily edited, protecting the document’s design and layout.
Steps to Convert Text to Outlines Using Preflight Tool
1. Open the PDF in Adobe Acrobat Pro
- Launch Adobe Acrobat Pro and open the PDF file you need to prepare.
2. Access the Preflight Tool
- Navigate to
Tools > Print Production. - Select
Preflightfrom the list of available tools. This tool is essential for checking and fixing various aspects of PDF files.
If in case you don’t know how to activate the preflight feature in Adobe Acrobat then follow the topic given here or watch the video given below.
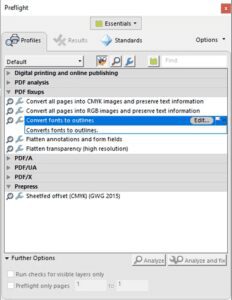
3. Select the Appropriate Preflight Profile
- In the Preflight dialog box, click on the wrench icon to access the list of fixup profiles.
- Search for the profile named “Convert text to outlines” or find it under the “PDF fixups” category.
- Select this profile to proceed with the conversion.
4. Run the Conversion
- With the “Convert text to outlines” profile selected, click the
Fixbutton at the bottom of the Preflight dialog box. - Adobe Acrobat Pro will process the document, converting all text into outlines. This means that all fonts will be replaced with vector shapes.
5. Save the Outlined PDF
- After the conversion is complete, save the newly outlined PDF file.
- Go to
File > Save Asand choose a new name or location to prevent overwriting the original file. - This newly saved file will now have all text as outlines, ensuring no font embedding issues.
Verifying the Conversion
To confirm that the text has been successfully converted to outlines, follow these steps:
- Check with the Edit PDF Tool:
- Open the new PDF in Adobe Acrobat Pro.
- Use the
Edit PDFtool to attempt to select text. If the text has been converted to outlines, it will be uneditable and treated as vector shapes.
- Check PDF Properties:
- Go to
File > Propertiesand click on theFontstab. - If the conversion was successful, the Fonts tab should not list any embedded fonts, indicating that all text has been converted to vector shapes.
- Go to
Conclusion
Delivering a PDF with outlined fonts ensures that your file is print-ready and free from font-related issues. The Preflight tool in Adobe Acrobat Pro provides a straightforward and reliable method for converting text to outlines. This process is essential for designers, prepress operators, and anyone involved in preparing files for print. By following these steps, you can confidently deliver your documents, knowing they will appear exactly as intended.
#ConvertTextToOutlines #AdobeAcrobatPro #PDFTextOutline #PrintProduction #PrintReadyPDF #FontConsistency #PDFEditing #VectorShapes #TextProtection #GraphicDesign