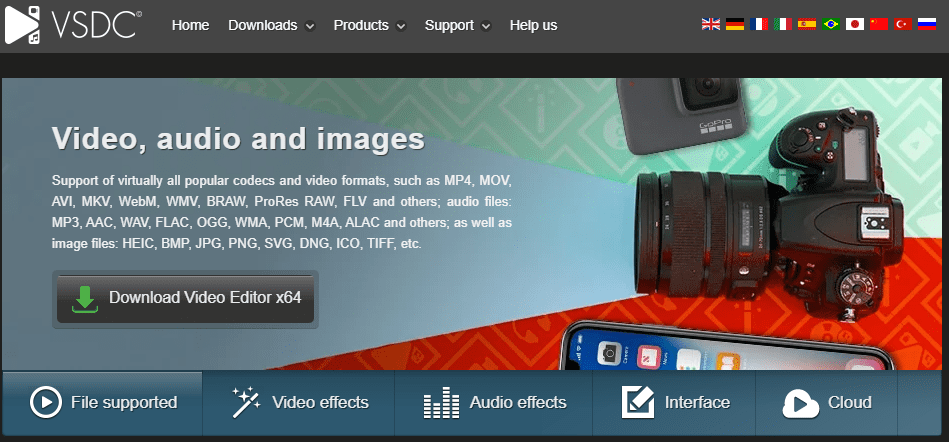
If you’re just starting your video editing journey and looking for a free, powerful, and feature-rich video editor, look no further than VSDC Free Video Editor. Whether you’re making YouTube videos, educational tutorials, vlogs, or presentations — VSDC gives you all the tools you need to create professional-looking content without spending a dime.
This detailed guide will walk you through the entire editing process from importing footage to applying effects, trimming, transitions, and exporting — all using the free version of VSDC, available for Windows users.
👉 Official Website: https://www.videosoftdev.com/free-video-editor
🛠️ What is VSDC Free Video Editor?
VSDC is a non-linear video editor that supports multi-layer editing, chroma keying (green screen), motion tracking, object animation, and more — without watermarks in the free version. It also offers tools like:
- Screen recording
- Video capture
- Audio editing
- Visual effects
- Custom transitions
Let’s get started with creating your first project.
📂 Step 1: Create a New Project
- Launch VSDC and click on Blank Project.
- You can manually enter settings like resolution, frame rate, etc.
- For YouTube, choose the YouTube preset which sets:
- Resolution: 1920×1080
- Frame Rate: 30 FPS
- Click Finish to start editing.
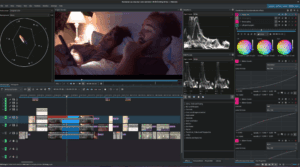
🖥️ Step 2: Interface Overview
- Top Ribbon Tabs:
- Project: Manage files
- Scene: Add and manage scenes
- Edit: Split, trim, cut, move objects
- View: Show/hide panels like Timeline, Properties, Resources
- Export: Render your final video
- Tools: Access utilities like screen capture, voice recorder
- Activation: Ignore this (used for Pro version)
📥 Step 3: Importing Video Clips
There are 3 ways to import clips:
- Add Video from top menu → choose file → set to “start of scene”
- Drag-and-drop files directly into the timeline
- Add to the Resources window, then drag into the timeline later
VSDC handles large files (e.g., 47 GB+) without lag, making it suitable for HD footage.
✂️ Step 4: Basic Timeline Editing
Split Video:
- Place the cursor where you want to split
- Use Ctrl + K or click Split into Parts in the Edit tab
Trim Start/End:
- Position the cursor
- Go to Editor tab → choose Trim Start or Trim End
Remove a Section:
- Use selection range tool
- Choose Cut out fragment to remove a specific part
🎞️ Step 5: Add B-Roll and Overlays
To add B-Roll:
- Drag the clip into the Resources window
- Drop it above your main footage layer
- Resize and reposition using drag handles
To overlay in a corner:
- Resize the clip and move it (top-left, bottom-right, etc.)
- Use the Properties window to set exact width, height, and coordinates
🖋️ Step 6: Add and Animate Text Titles
- Go to Editor tab → Add Text
- Choose position: at cursor, start of scene, etc.
- Type your text (e.g., name, YouTube handle)
- Customize:
- Font: Any system font (e.g., Lato Black)
- Color: Choose any from the color wheel
- Size: Adjust directly or via Properties
- Duration: Set via drag or precise time entry
Add Fade In/Out:
- Select text layer → Video Effects → Transitions → Fade
- Choose start or end of scene
- Adjust fade duration (default: 1 sec)
🎚️ Step 7: Add Effects and Transitions
To add transitions between clips or for B-roll:
- Go to Video Effects → Transitions
- Choose:
- Fade
- Wipe
- Slide
- Set position (start or end of scene) and duration
These transitions help smooth out cuts and make your edits look cinematic.


📌 You Might Be Interested in These Articles Too:
- Create Stunning AI-Powered Videos Without Lag: Best CapCut Alternative for PC Editing
- How to Use Canva Video Editor: A Complete Beginner’s Guide to Creating Stunning Videos for Free
- How to Convert Text into Video with AI in Just 1 Minute Using InVideo AI (Mobile Guide)
- How to Create Faceless AI YouTube Shorts That Can Earn Up to $360,000 Per Month
- How to Find Viral YouTube Keywords Using SEMrush (And Rank Long-Term)
🎯 Step 8: Add Movement (Animate Objects)
Want to make an arrow or icon move across the screen?
- Add the object (e.g., image or shape)
- Double-click the object layer → click Movement
- Use Cursor position to mark where movement should end
- Click destination point on canvas
This is great for pointing to buttons or drawing viewer attention.
🎵 Step 9: Add Background Music
- Add audio file to Resources or drag directly into timeline
- Align it with video start
- Adjust volume:
- Click on audio layer
- Open Properties window
- Set volume (e.g., -30 dB for background tracks)
🎧 Pro Tip: Always preview with headphones to balance voice and music.
🎨 Step 10: Color Grading
Go to View tab → Enable Basic Effects Panel
Adjust:
- Brightness
- Contrast
- Gamma
- Color Temperature
- Sharpness
You can also apply Hue/Saturation Curves for advanced looks.
🎬 Step 11: Preview and Export
- Use full-screen preview (maximize playback area)
- Trim extra music or gaps
- Go to Export Project tab
Choose:
- Device = Web
- Format = YouTube
- Use default preset or customize bitrate and resolution
Click Export Project, ignore upgrade prompt, and your video will render!
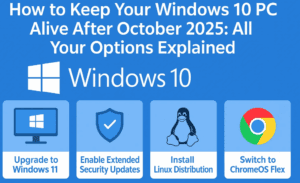
❓ Frequently Asked Questions
Q: Is VSDC really free?
Yes! The free version includes all essential editing tools, effects, and transitions. Only a few advanced features (hardware acceleration, motion tracking) are Pro-only.
Q: Can I export in HD/4K without watermarks?
Yes, the free version allows 1080p and 4K exports with no watermark.
Q: Is VSDC good for YouTube videos?
Absolutely. It supports YouTube presets, title templates, and professional transitions that suit vlogs, tutorials, and content creators.
🧠 Final Thoughts
VSDC Free Video Editor is one of the most underrated tools for creators. It’s light, capable, and 100% free — making it perfect for beginners and intermediate editors alike.
Whether you’re producing educational content, gaming videos, or a personal vlog, VSDC has everything you need to make your video stand out.
🔗 Helpful Links
- ✅ Download VSDC Free Video Editor
- 🎵 Royalty-Free Music: Epidemic Sound
- 🖼️ Free Stock Footage: Pixabay
🏷️ Tags
vsdc video editor, free video editing software, vsdc tutorial, vsdc beginner guide, youtube video editing, video editing software windows, how to use vsdc, edit videos free
📢 Hashtags
#VSDC #VideoEditing #FreeVideoEditor #YouTubeEditing #EditLikeAPro #VideoEditingTips #VSDCTutorial #BeginnerEditor #ContentCreation
Disclaimer: This article is based on the free version of VSDC as of 2025. Feature availability may change in future updates. Always review licensing terms for music or footage used in your projects.