Creating a professional catalog in Adobe InDesign can seem like a daunting task. However, with the right approach and tools, you can turn your ideas into visually compelling designs that captivate your audience. This article provides a detailed guide to streamline the process, along with valuable design tips to help you craft a polished catalog efficiently.
Step 1: Gather Brand Elements
Before diving into the design process, gather all necessary brand elements from your client:
- Logo: Ensure the logo is high-quality and in a suitable format, such as SVG or PNG.
- Fonts and Typography: Use the brand’s specific fonts to maintain consistency.
- Color Codes: Collect the brand’s color palette in hex codes for precise color matching.
Place these elements on a guideline page in InDesign. This makes it easier to apply them to various pages as you design.
Step 2: Prepare High-Quality Images
High-quality product photos are essential for a professional-looking catalog. Use tools like Adobe Lightroom to enhance and standardize images before adding them to your catalog.
Step 3: Set Up a New InDesign Document
- Open Adobe InDesign and create a new document.
- Determine the Catalog’s Intent: Decide if the catalog is for web or print. This choice influences key settings such as resolution and bleed.
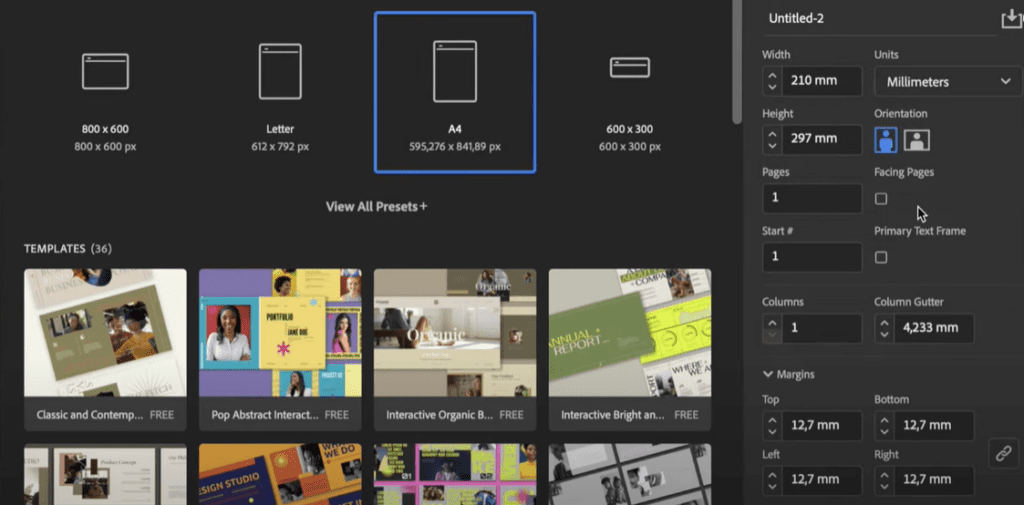
- Configure Document Settings:
- Page Size: Choose A4 and set the orientation to portrait.
- Columns: Set to one for simplicity.
- Margins: Use 12mm to ensure content is neatly framed and separated from the page edge.
- Bleed and Slug: If creating a version for print, set appropriate bleed values (e.g., 3mm) for proper trimming.
Step 4: Design Layout Spreads
- Create Multiple Layouts:
- Left page: Full background image.
- Right page: Product grid or description layout.
- Both pages: Product-focused layouts.
- Maintain Consistency: Duplicate layouts to ensure uniformity across the catalog. Use white space strategically to keep the design clean and highlight products effectively.
Step 5: Work with Parent Pages
Use parent pages in InDesign to apply recurring elements like:
- Page numbers.
- Brand headers or footers.
- Links to the client’s website or order page.
Parent pages ensure these elements appear consistently throughout the catalog.
Step 6: Populate the Catalog
- Add Images and Text:
- Place product images using the “Place” command (
Ctrl+DorCmd+D). - Insert product descriptions, ensuring alignment with brand fonts and colors.
- Place product images using the “Place” command (
- Enhance Design with Shapes:
- Create shapes and fill them with brand colors or product images.
- Use color swatches to add visual appeal.
- Use Paragraph Styles:
- Define paragraph styles early for headings, subheadings, and body text.
- Apply these styles consistently for a cohesive look.
Step 7: Finalize the Catalog Design
- Design Front and Back Covers:
- Analyze existing designs to maintain brand familiarity.
- Include the brand name at the top, a featured product in the middle, and contact details or the website at the bottom.
- Double-Check Content:
- Review all text, images, and design elements for accuracy.
- Switch to high-quality display settings for a final review.
Step 8: Export the Catalog
- Save the Document: Create a copy for web sharing and give it a unique name to differentiate it from the print version.
- Export as PDF:
- Go to the
File > Exportmenu. - Select “Adobe PDF” and ensure settings match your initial document configuration.
- Click “Export” to generate the PDF.
- Go to the
Step 9: Share the Catalog
Instead of sending the catalog as an email attachment, consider uploading it to an online platform like Flipsnack. Flipsnack allows you to share your catalog via a simple link, making it more accessible for clients and customers.
Conclusion
By following these steps, you can create a polished and professional digital catalog in Adobe InDesign. The process not only saves time but also ensures consistency and brand alignment, leaving a lasting impression on your audience.
#AdobeInDesign #CatalogDesign #GraphicDesign #InDesignTips #DigitalCatalog #DesignTutorials #BrandConsistency #ProductCatalog


