Grids are essential tools in design, ensuring your layouts are balanced, organized, and visually appealing. Adobe InDesign provides powerful tools to create and customize grids for any project. This article walks you through the steps to create and lock grids for effective design workflows.

Step 1: Create a New Document
Before setting up a grid, start by creating a new document:
- Open InDesign and navigate to File > New > Document (or use the shortcut
Ctrl + Non Windows orCmd + Non Mac). - In the New Document dialog box, select your preferred format. For this example, choose an A4 size.
- Click the Create button to generate the new document.
Step 2: Setting the Guide Color
Adjusting the color of your guides can make them easier to see against your design:
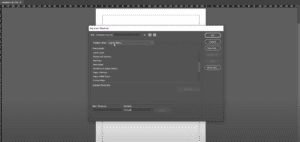
- Go to Layout > Ruler Guides.
- In the Ruler Guides dialog box:
- Leave the View Threshold unchanged.
- Select a color under the Color dropdown menu.
- For better visibility, choose a darker color like Brick Red.
- Click OK to apply the changes.
Step 3: Creating the Grid
Follow these steps to set up rows and columns to create your grid:
- Navigate to Layout > Create Guides.
- In the Create Guides dialog box:
- Rows and Columns: Enter the desired number of rows and columns. For example:
- Set Rows to
5and Columns to5.
- Set Rows to
- Gutter: Adjust the space between the rows and columns. To eliminate this space, set the Gutter to
0. - Fit To: Decide where the grid aligns:
- Margins: Align the grid within your document’s margins.
- Page: Align the grid to the entire page, starting from its edges.
- Rows and Columns: Enter the desired number of rows and columns. For example:
- Review the grid preview and make further adjustments if needed.
- Once satisfied, click OK to apply the grid.
Step 4: Locking the Guides
To prevent accidental movement or deletion of the guides, lock them:
- Go to View > Grids & Guides > Lock Guides.
- Once locked, the guides can no longer be selected or moved.
Tips for Customizing Your Grid
- Change Row and Column Numbers: You can set any number of rows and columns based on your layout needs, such as 8 rows or 10 columns.
- Adjust Color Spacing: Experiment with the Gutter setting to achieve the desired balance between rows and columns.
- Toggle Guide Visibility: Use the shortcut
Ctrl + ;(Windows) orCmd + ;(Mac) to show or hide the guides while designing.
Summary
Creating grids in Adobe InDesign helps you maintain alignment and structure in your designs. From adjusting the guide color to customizing the number of rows and columns, the flexibility of InDesign’s tools ensures you can create a grid tailored to your project needs. Don’t forget to lock your guides to maintain consistency as you work.


