When designing professional documents in Adobe InDesign, bleed is an essential element that ensures your artwork extends seamlessly to the edge of a printed page. Adding bleed prevents unwanted white margins when the paper is trimmed after printing.
In this article, we’ll explore two simple methods to add bleed to your InDesign documents:
- While creating a new document
- After setting up your document
Let’s get started!
What is Bleed in InDesign?
Before diving into the steps, it’s essential to understand what bleed is. Bleed refers to the area that extends beyond the document’s actual size to ensure clean and edge-to-edge printing. The most common bleed size for print designs is 3 millimeters (mm) on all sides.
Method 1: Adding Bleed While Creating a New Document
Follow these steps to set up bleed while creating a brand-new document:
- Create a New Document:
- Go to the File menu and choose New > Document.
- Alternatively, you can use the keyboard shortcut Ctrl + N (Windows) or Cmd + N (Mac).
- Adjust Document Settings:
- In the New Document window, you’ll see options to change page settings like size, orientation, and margins.
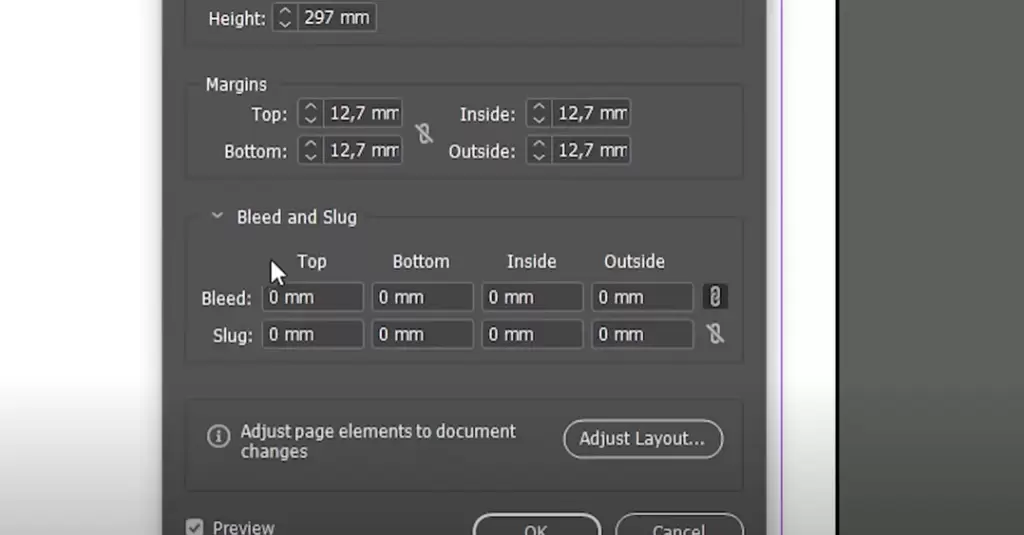
- Scroll down to locate the section named Bleed and Slug.
- Set the Bleed:
- In the Bleed field, type in your preferred bleed size. For standard print designs, set the bleed to 3 mm for all sides.
- To ensure consistency, link the bleed values by clicking the chain icon next to the fields. This automatically applies the same value to all sides.
- Confirm and Create:
- Once you’ve set the bleed, click Create to finalize the document.
- Your new document will now include the bleed area, which you’ll see marked as a red border around the page.
Method 2: Adding Bleed to an Existing Document
If you’ve already created a document and forgot to set up the bleed, don’t worry! You can add bleed later using these steps:
- Open Document Setup:
- Go to the File menu and select Document Setup.
- Alternatively, use the keyboard shortcut Ctrl + Alt + P (Windows) or Cmd + Option + P (Mac).
- Adjust Bleed Settings:
- In the Document Setup window, scroll down to locate the Bleed and Slug section.
- Enter your desired bleed size (e.g., 3 mm) in the fields.
- Ensure all sides are linked by clicking the chain icon if it’s not already linked.
- Preview and Confirm:
- Enable the Preview checkbox to see the changes in real time. This allows you to check that the bleed area appears correctly.
- Once satisfied, click OK to apply the settings.
Your bleed will now be added to the existing document, and you’ll see the red border indicating the bleed area.
How to Check Bleed in Your Document
To make sure the bleed has been added successfully, you can:
- View your document in the Normal mode and look for the red border around the edges.
- Use the Print Preview feature to confirm that your bleed area extends beyond the page trim.
Why Adding Bleed is Important
- Prevents white edges when trimming printed materials.
- Ensures a professional finish for brochures, flyers, posters, and other print materials.
- Required by most printing services for accurate results.
Conclusion
Adding bleed to your InDesign documents is a simple yet crucial step for producing high-quality print designs. Whether you’re setting up a new document or modifying an existing one, following these methods will ensure your artwork is ready for a clean, professional print finish.
By mastering this technique, you’ll elevate your design work and avoid unnecessary printing mishaps.
#InDesignTips #GraphicDesign #AdobeInDesign #PrintDesign #BleedSetup #DesignTutorial #PrintingTips #DesignWorkflow #CreativeDesign
Let me know if you need any additional edits or explanations!


