Adding automatic page numbers is an essential feature in Adobe InDesign for creating professional documents such as books, magazines, and brochures. It saves time and ensures consistency, especially when working with multi-page layouts. This article provides a detailed guide on how to add automatic page numbers to your InDesign document using master pages.

Step 1: Open the Pages Panel
- Start by opening your InDesign document.
- Go to the Pages Panel.
- If the Pages Panel is not visible, enable it by navigating to Window > Pages.
- Double-click on the Master Page (usually labeled A-Master) to open it. Master pages allow you to create repeating elements, such as page numbers, that automatically apply to all pages using that master.
Step 2: Select the Type Tool
- In the Tools Panel, select the Type Tool (shortcut T).
- Click and drag to create a text box in the desired location for your page number. A common choice is at the bottom corner of the page, but you can place it anywhere depending on your design.
Step 3: Insert a Special Character for Page Numbers
- With the text box active, right-click inside it.
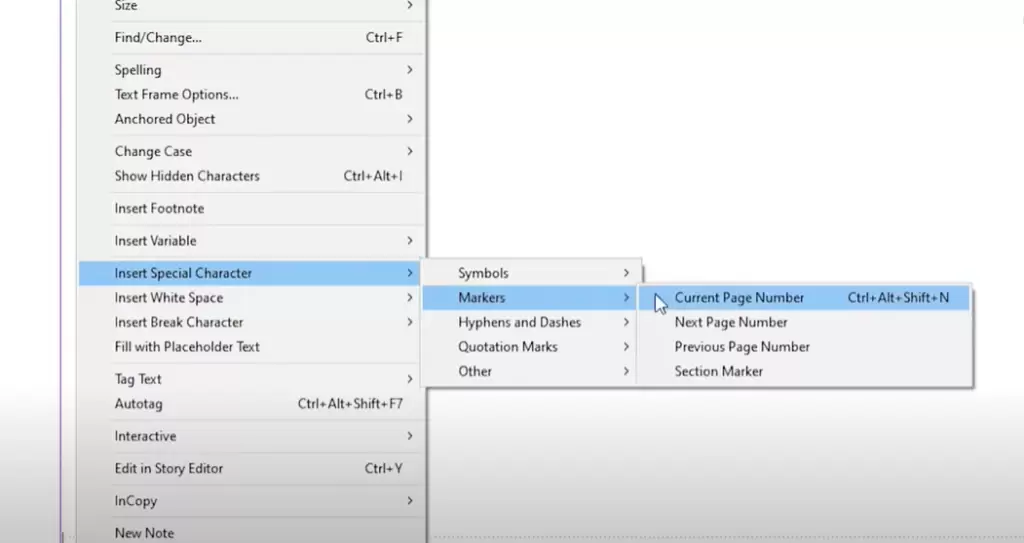
- From the context menu, select Insert Special Character > Markers > Current Page Number.
- The text frame will display the letter corresponding to the master page label (e.g., A for A-Master). This placeholder will automatically update to show the correct page number on each document page.
Step 4: Style the Page Numbers
- Use the Character Panel or Control Panel to format the page number:
- Change the font style, size, or color to match your design.
- Align the text within the box (e.g., left, center, or right).
- Adjust the text box placement as needed to ensure the page numbers align consistently across your document.
Step 5: Apply the Master Page
- Return to the Pages Panel and drag the A-Master (or your selected master page) onto the pages where you want the page numbers to appear.
- The placeholder text on the master page will now display the correct page numbers on each assigned page.
Step 6: Add More Pages
If you need to add additional pages to your document, Adobe InDesign will automatically assign page numbers based on their position in the layout.
- To add more pages, go to Layout > Pages > Add Pages or use the + icon in the Pages Panel.
- The page numbers will update dynamically without requiring additional input.
Conclusion
Adding automatic page numbers in Adobe InDesign is a straightforward process that enhances the professionalism and efficiency of your document design. By using master pages and the special character for current page numbers, you can ensure consistency across your layout while saving time.
Experiment with the placement and styling of your page numbers to complement your design, and let InDesign handle the rest.
We hope this guide helps you streamline your workflow. Share your thoughts and tips in the comments below!
#InDesign #AdobeInDesign #PageNumbering #MasterPages #GraphicDesign #InDesignTutorial #DocumentAutomation #PageLayoutDesign #InDesignTips #ProfessionalLayouts


