When working on layouts in Adobe InDesign, efficiently duplicating and arranging elements is key to maintaining a smooth workflow. InDesign offers three powerful features to help with this: Copy, Duplicate, and Step and Repeat. Each command has its unique application, and mastering them can save you time and effort. This blog post will guide you through using these commands effectively.

1. Copy Command
The Copy command allows you to duplicate objects and paste them elsewhere in your document.
How to Copy an Object
- Select the object you want to copy.
- Go to Edit > Copy or press Ctrl+C (Windows) / Cmd+C (Mac).
- To paste the copied object:
- Use Edit > Paste or press Ctrl+V (Windows) / Cmd+V (Mac).
- The object will appear at the center of your current view.
Pasting Options
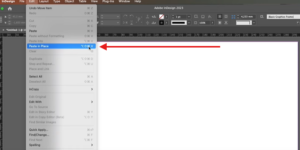
- Paste in Place: To paste the object in the same location on another page, use Edit > Paste in Place (shortcut: Shift+Ctrl+Alt+V / Shift+Cmd+Option+V).
- Paste Into: To paste an object into a selected frame, use Edit > Paste Into.
2. Duplicate Command
The Duplicate command is a quick way to create a copy of an object and move it slightly from its original position.
How to Duplicate an Object
- Select the object.
- Go to Edit > Duplicate, or use the shortcut Ctrl+Alt+Shift+D (Windows) / Cmd+Option+Shift+D (Mac).
The duplicated object appears slightly offset from the original, making it easy to see and manipulate.
3. Step and Repeat Command
Step and Repeat is a powerful tool for creating multiple duplicates of an object with precise spacing. It’s perfect for creating grids, patterns, or evenly spaced elements.
How to Use Step and Repeat
- Select the object you want to duplicate.
- Go to Edit > Step and Repeat.
- In the Step and Repeat dialog box, configure the following:
- Repeat Count: Enter the number of duplicates you want.
- Horizontal Offset: Specify the spacing between duplicates horizontally.
- Vertical Offset: Specify the spacing between duplicates vertically.
- Click OK to generate the duplicates.
Example:
To create a grid of squares with 10 horizontal and 5 vertical repetitions:
- Set Repeat Count to 10.
- Enter appropriate values for Horizontal Offset and Vertical Offset based on your grid size.
Tips for Using These Commands
- Hold Alt (Option on Mac):
- When dragging an object, hold Alt/Option to create a duplicate.
- Snap to Grid:
- Enable snapping to ensure precise alignment of duplicated objects.
- Go to View > Grids & Guides > Snap to Grid.
- Combine with Transform Again:
- After using Step and Repeat, use Object > Transform Again or press Ctrl+Alt+4 (Windows) / Cmd+Option+4 (Mac) to replicate the same transformation elsewhere.
When to Use Each Command
- Copy: Ideal for creating a single duplicate to paste anywhere in the document.
- Duplicate: Best for quick, slight offsets of an object near its original position.
- Step and Repeat: Perfect for creating multiple duplicates with consistent spacing.
Conclusion
Understanding the differences between Copy, Duplicate, and Step-and-Repeat in Adobe InDesign will streamline your workflow and make creating complex layouts faster and easier. Practice these commands to find the best approach for your projects and enjoy the precision and flexibility InDesign offers.
#InDesign #GraphicDesign #DesignTools #StepAndRepeat #AdobeInDesignTips #DuplicateObjectsInDesign
