Saving files properly in Adobe InDesign is crucial to maintaining your workflow and avoiding potential data loss. In this article, we’ll explore the different methods for saving files, the advantages of each, and best practices to ensure your files are stored securely and efficiently.
Step 1: The Basics of Saving Files
Saving a file in Adobe InDesign can be done quickly using a keyboard shortcut. On Windows, press Ctrl + S, and on Mac, use Cmd + S. This is the most basic and widely used method to save any document.
Step 2: Save vs. Save As vs. Save a Copy

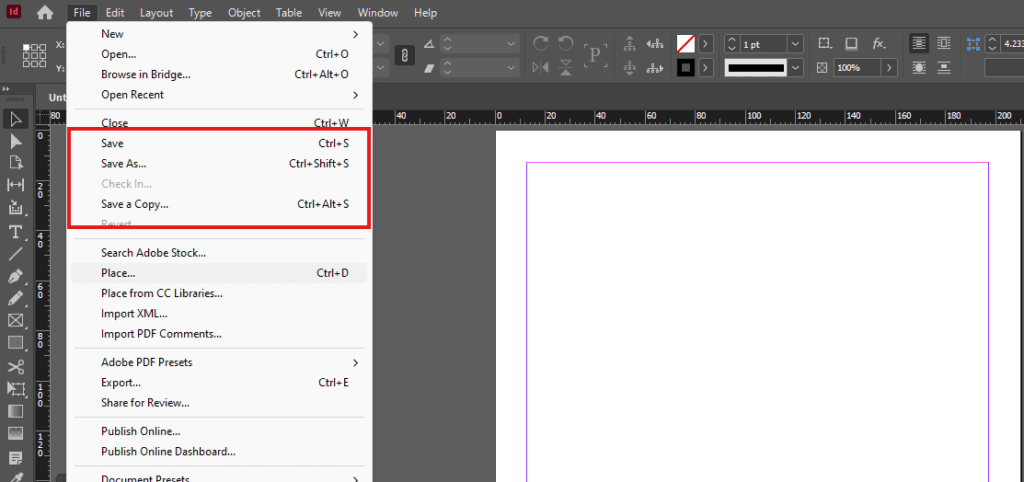
When you navigate to File > Save, you’ll notice three options:
- Save: This saves the current state of your document.
- Save As: This allows you to save the file under a different name or location. Use the shortcut Shift + Ctrl + S (Windows) or Shift + Cmd + S (Mac).
- Save a Copy: This creates a backup copy of your file while keeping the original document open. Use the shortcut Alt + Ctrl + S (Windows) or Option + Cmd + S (Mac).
Key Differences:
- Save: Updates the file in its current location.
- Save As: Renames or relocates the file while keeping the new file open.
- Save a Copy: Saves a duplicate file, but the original document remains open for editing.
Step 3: Selecting the Right Location
Avoid saving files in system folders like Desktop, My Documents, or the primary operating system drive (e.g., C: drive). These locations are prone to data loss if your system crashes or encounters issues. Instead, save your files on a secondary or external drive, such as D: or E:, for better security and accessibility.
Best Practices:
- Create a Dedicated Folder: Organize your files by project. For example, create a folder named “Tutorials” to store all your work.
- Add Descriptive Names: Include details like document size in the file name (e.g.,
Test_Document_5x7.indd) for easy identification. - Backup Regularly: Use cloud storage or an external drive for additional safety.
Step 4: Using Save As for Specific Scenarios
If you need to save the file with a different name or in a different location, follow these steps:
- Go to File > Save As.
- Choose a new name and location for the file.
- Click Save.
- The newly saved file will now be open, allowing you to continue working seamlessly.
Step 5: Using Save a Copy for Collaborations
When working in a shared environment, such as an office or with a design team, it’s important to use Save a Copy for sharing files.
Why Save a Copy?
- The primary file remains locked, ensuring no one else can overwrite your work.
- The copy can be shared with team members for review or edits.
- Navigate to File > Save a Copy.
- Select a name and location for the duplicate file.
- Share the copy while continuing to work on the original file.
Step 6: Avoid Common Mistakes
Mistake 1: Saving Files on the Desktop
- Files on the desktop are at risk of being lost during system crashes. Always save files on a secondary drive or cloud storage.
Mistake 2: Not Using Save As or Save a Copy
- If you need to create backups or share files, failing to use these options can lead to overwritten files and lost work.
Mistake 3: Incomplete File Naming
- Avoid vague file names like “Untitled1.” Always include specific details for clarity.
Step 7: Checking File Information
After saving, you can view your file information to ensure everything is in order. The file’s details, such as name and location, are displayed in Adobe InDesign’s interface for your reference.
Final Thoughts
Understanding the difference between Save, Save As, and Save a Copy in Adobe InDesign can significantly improve your workflow and prevent errors. By following these steps and best practices, you can ensure that your files are secure, organized, and ready for future use.
#AdobeInDesign #SaveFiles #FileManagement #InDesignTips #GraphicDesignTips #DocumentSecurity #InDesignTutorials


