Creating and setting up a new document is a crucial step in any design workflow in Adobe InDesign. In this article, we’ll walk through the detailed process of setting up a new document, including advanced settings like presets, bleed, and slug.
Step 1: Starting with the Basics
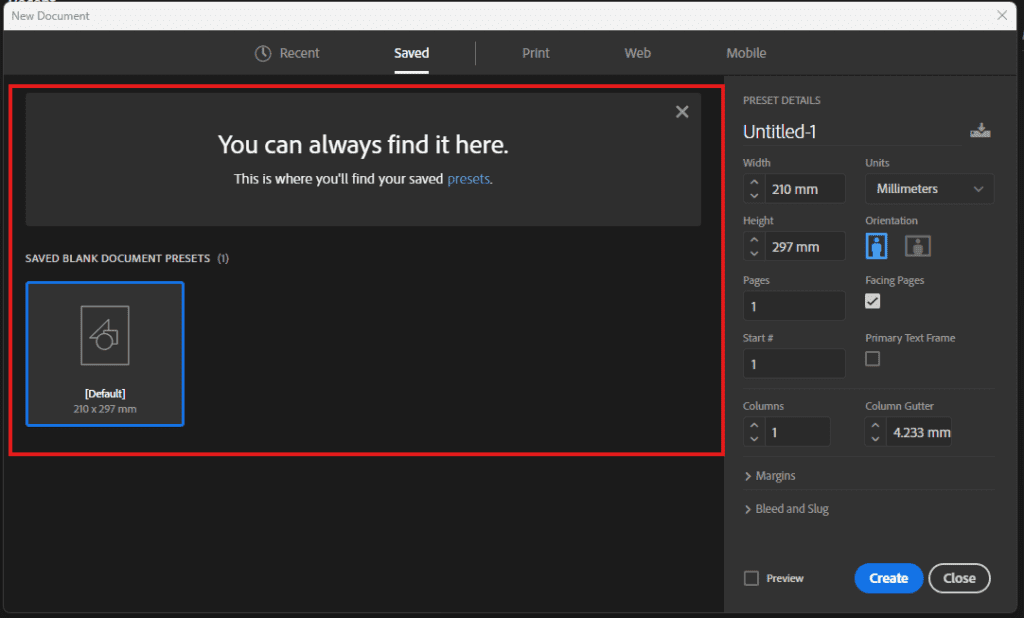
Begin by opening Adobe InDesign and navigating to File > New > Document. You’ll see options to set up your document size, page count, margins, and columns. Here’s a quick overview:
- Page Size: Define the width and height of your document. For example, set 5×7 inches for a greeting card or similar project.
- Number of Pages: Specify how many pages you need.
- Margins: Set top, bottom, inside, and outside margins based on your layout requirements.
Step 2: Using Presets for Repeated Layouts
Presets are a great way to save time if you frequently use the same document dimensions and settings.
- After entering all your desired settings, click on the Save Preset button.
- Name your preset (e.g., “5×7 Greeting Card”) and save it.
- The next time you create a new document, you can select this preset from the dropdown menu instead of entering the details manually.

Step 3: Understanding Bleed and Slug
Bleed and slug settings ensure your designs print accurately and professionally.

What is Bleed?
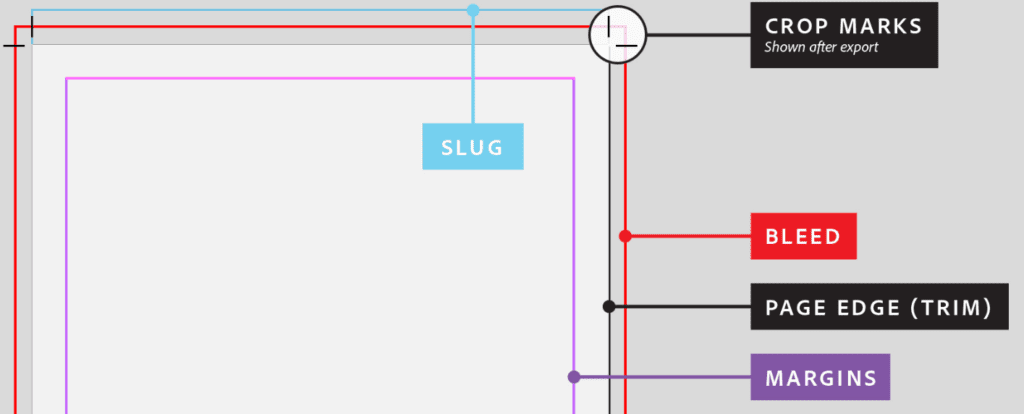
Bleed refers to the area that extends beyond the edges of your page. It ensures that no white edges appear after the document is trimmed. A standard bleed size is 3mm, but it may vary depending on your printer’s requirements.
How to Set Bleed in InDesign:
- In the New Document window, click on More Options.
- Locate the Bleed and Slug section.
- Enter 3mm (or the required value) for top, bottom, inside, and outside bleed.
Once set, a red line will appear around your page, marking the bleed area. Ensure that any background colors or images extend into this area.
What is Slug?
Slug is an area outside the bleed that is used for information purposes, such as document details, print instructions, or notes. This area does not get printed and is purely for reference.
- In the Bleed and Slug section, set the slug size (e.g., 10mm at the bottom).
- Use this area to add details like file name, version number, or contact information for the printer.
Step 4: Preview and Finalize Your Document
After setting up your document, you can preview the bleed and slug areas by going to View > Screen Mode > Bleed Mode. This ensures that all your design elements are correctly placed.
Step 5: Exporting with Bleed and Slug
When exporting your document for printing, make sure the bleed and slug settings are included.
- Go to File > Export and choose PDF (Print).
- In the Export Adobe PDF dialog box, navigate to the Marks and Bleeds tab.
- Check the boxes for Use Document Bleed Settings and, if necessary, Include Slug Area.
- Click Export to create your print-ready file.
Final Thoughts
With these steps, you can confidently set up a new document in Adobe InDesign, ensuring that your designs are professional and print-ready. Whether you’re working on a one-time project or creating templates for repeated use, mastering these settings will streamline your workflow.
#AdobeInDesign #GraphicDesign #DocumentSetup #BleedAndSlug #DesignPresets #InDesignTips #PrintingEssentials


