If you’ve just purchased a modem router combo device like the Netgear Nighthawk AX2700 (or any similar model), you’re probably wondering how long it will take to set up and get your internet running smoothly. The good news is that the process is straightforward, and with a little patience, you can have everything working in under an hour.
In this article, I’ll walk you through the complete setup process — from unboxing to configuring your Wi-Fi settings — while also explaining why each step matters. Even if you don’t have the Netgear AX2700 specifically, don’t worry. The steps apply to almost all modem-router combo devices, regardless of brand or model.
👉 If you want to check out the Netgear AX2700, you can find it here: Netgear AX2700 on Amazon
📦 Step 1: Unboxing Your Modem Router Combo
When you first open the box, you’ll typically find:
- The modem router combo device itself.
- A power adapter.
- An Ethernet cable (though in many cases, you may not need it for the initial setup).
Before diving into connections, always remove the device from its protective plastic and ensure you keep all accessories handy.
💡 Tip: Store the Ethernet cable safely. Even if you don’t use it now, it can be useful for troubleshooting later.
📑 Step 2: Confirm You Have an Active Internet Plan
It might sound obvious, but this step is crucial. Your modem router combo will not work unless you already have an active internet service plan with a provider such as Xfinity, Comcast, Spectrum, Cox, or others.
If your subscription isn’t active or payments are pending, the device setup won’t connect to the internet. So, make sure your ISP account is in good standing before continuing.
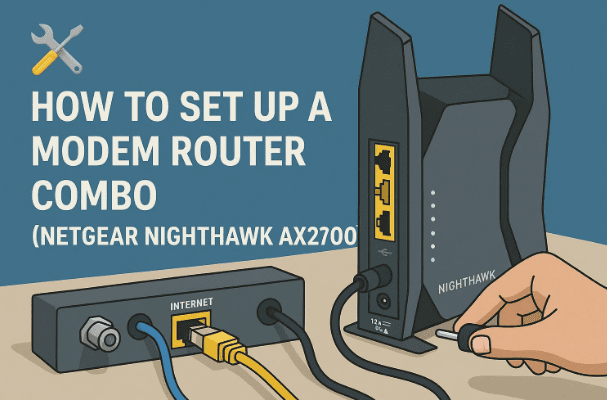
🔌 Step 3: Connect the Coaxial Cable
Your modem router combo connects to the internet using a coaxial cable (the round cable with a screw-on connector).
- Find the coaxial wall jack in your home.
- Attach one end of the coaxial cable to this wall jack.
- Screw the other end into the coaxial port on the back of the modem router combo.
- Tighten the connection so it’s secure — loose fittings can cause weak signals.
💡 Why this matters: The coaxial cable is your device’s lifeline to your internet service provider (ISP). Without this connection, your device can’t receive a signal.
🔋 Step 4: Connect the Power Cable
Now, let’s bring the device to life.


- Plug the power adapter into the modem router combo.
- Connect the other end into a wall outlet or surge protector.
- Wait for the indicator lights to start flashing.
The device will take a few minutes to boot up. Watch for the lights to turn steady instead of blinking. One key indicator is the globe icon light — this represents your internet connection. Once it’s steady, the device is ready for the next step.
📝 Step 5: Locate the MAC Address
Before your ISP can provide service through your new device, they need to register its MAC address.
- On the bottom or side of your modem router, you’ll find a sticker.
- Look for a 12-digit alphanumeric code labeled “MAC.”
- Write it down carefully — this will be used during activation.
💡 What is a MAC Address?
It’s a unique identifier for your device. Think of it as a digital fingerprint that tells your ISP, “This specific device belongs to your account.”
📲 Step 6: Register Your Device With the ISP
This is one of the most important steps. Without registering, your modem router won’t get online.
Most ISPs provide mobile apps or websites to make activation easier. Here’s an example with Xfinity (your provider’s app or portal may look slightly different):
- Open the ISP app (e.g., Xfinity app).
- Log in with your account credentials.
- Select Begin Activation or Register New Device.
- Choose Use Own Modem (since you purchased your own).
- Enter the MAC address (or scan the QR/barcode on the modem).
- Follow the on-screen instructions until activation completes.
The app may instruct your modem to restart automatically. This is normal and usually takes about 5–10 minutes.
📶 Step 7: Connect to the Default Wi-Fi
Once the device restarts and stabilizes, it begins broadcasting a default Wi-Fi network.
- Check the side or bottom of your modem for the default SSID (network name) and Wi-Fi password.
- On your laptop or phone, go to Wi-Fi settings.
- Select the default network (e.g., Netgear82).
- Enter the provided password.
At this point, you should be able to connect to the internet! 🎉
🌐 Step 8: Access the Router Settings Page
Now that you’re online, it’s time to configure your network settings for better security and personalization.
- Open a web browser.
- In the address bar, type the local setup URL (commonly routerlogin.net for Netgear devices).
- If you see a warning like “insecure connection,” don’t worry — this is because you’re connecting locally, not through the internet.
- Continue, and log in with the admin username and default password (provided on the device sticker).
From here, you’ll be able to access the full control panel for your device.
🔐 Step 9: Change Admin Password and Wi-Fi Settings
It’s tempting to skip this step, but for security, you must personalize your login and Wi-Fi.
- Admin Login: Create a strong, unique password for the router’s admin page. Avoid using “1234” or your name.
- Wi-Fi Network Name (SSID): Change it from the default (e.g., Netgear82) to something recognizable but not too personal.
- Wi-Fi Password: Create a secure password with a mix of letters, numbers, and symbols.
💡 Optional Tweaks:
- Enable a Guest Network for visitors.
- Set parental controls if you have children.
- Adjust channel settings to reduce interference if you live in a crowded apartment area.
⏳ Step 10: Final Checks
After making changes, let the device restart one last time. Test the connection on multiple devices (phone, laptop, tablet) to confirm everything works smoothly.
On average, the entire process — from unboxing to a working Wi-Fi — takes around 30–40 minutes. Most of that time is waiting for the modem to reboot and sync with your ISP.
❓ FAQs About Setting Up a Modem Router Combo
Q1: Do I need to use the Ethernet cable?
Not necessarily. It’s mostly included for wired connections or troubleshooting. For setup, Wi-Fi is usually enough.
Q2: What if my ISP doesn’t recognize the modem?
Double-check the MAC address. If it still fails, contact your ISP support and provide them with the MAC manually.
Q3: Can I skip changing the Wi-Fi name and password?
You can, but it’s strongly discouraged. Leaving default settings makes your network vulnerable to hacking.
Q4: Will these steps work for other brands (Arris, Motorola, TP-Link)?
Yes! The process is nearly identical for all modem-router combos, with only small variations in menu names or URLs.
⚠️ Disclaimer
This article is for educational purposes. Setup steps may vary slightly depending on your device model and internet provider. Always follow your manufacturer’s instructions and ISP’s official guidelines for the most accurate process.
✅ Conclusion
Setting up a Netgear Nighthawk AX2700 modem router combo (or any similar device) is simpler than it looks. With just a coaxial cable, power adapter, and a few app-based steps, you’ll be online in no time.
While the initial setup is easy, don’t forget the final touches: securing your admin login, customizing your Wi-Fi, and registering the device correctly with your ISP.
👉 If you’re interested in checking out the Netgear AX2700 yourself, you can find it here: Netgear AX2700 on Amazon
Tags: modem router setup, netgear nighthawk ax2700, routerlogin.net, wifi setup, isp activation, network configuration, internet troubleshooting
Hashtags: #Netgear #RouterSetup #WiFiTips #Networking #HomeInternet #AX2700 #TechGuide


