If you’re looking to collect donations through your WordPress website, you’re in the right place. Whether you’re an individual, non-profit, or organization, setting up a donation page and adding a Donate button is easier than you think — and can be done without writing a single line of code.
This article will walk you through how to:
- Install the GiveWP plugin
- Create a donation form
- Add the form to a page
- Customize the appearance
- Connect Stripe and PayPal for secure payments
Let’s dive in.
🔧 Step 1: Install the GiveWP Plugin
To start accepting donations, you’ll need a donation plugin. One of the best free options is GiveWP.
- Log in to your WordPress dashboard.
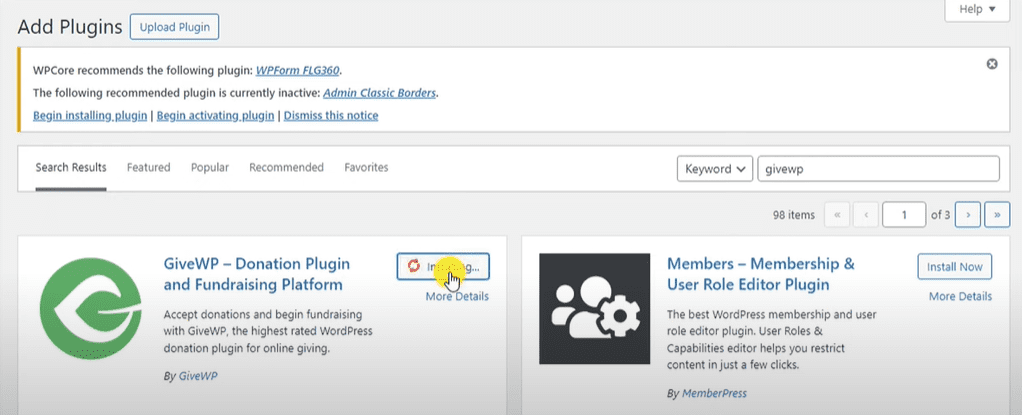
- Go to Plugins → Add New.
- In the search bar, type: GiveWP.
- Locate the plugin named “GiveWP – Donation Plugin and Fundraising Platform”.
- Click Install, then Activate.
🛠️ Step 2: Set Up the Plugin
Once activated, GiveWP will guide you through its initial setup wizard.
- Click Start Setup.
- Tell GiveWP about yourself:
- If you’re collecting donations as an individual, select Individual.
- Choose a fundraising category (e.g., Education, Medical, Community, etc.).
- Select your country and state, and choose your preferred currency (e.g., USD).
- Choose the elements you’d like to include in your first donation form (like Donation Goal, PDF Receipts, etc.).
- Click Continue to complete the setup.
💳 Step 3: Connect Payment Gateways (PayPal & Stripe)
To start receiving donations, you’ll need to connect payment gateways.
- To connect PayPal:
- Go to the PayPal section during setup.
- Click Connect with PayPal and follow the prompts.
- To connect Stripe:
- Click Connect with Stripe to securely link your Stripe account.
These platforms will allow you to collect payments directly on your website.
📄 Step 4: Create a Donation Page
Now that your donation form is ready, it’s time to place it on a page.
- In your WordPress dashboard, go to Donations → All Forms.
- Copy the shortcode for your donation form (e.g.,
[give_form id="123"]). - Go to Pages → Add New.
- Title the page (e.g., “Donation Page”).
- Click Add Block → Shortcode, and paste the copied shortcode.
- Publish the page and preview it.
You now have a live donation form on your WordPress site!
🎨 Step 5: Customize Your Donation Form
Make your donation form match your brand by customizing its look and feel.
- Go to Donations → All Forms and click the donation form you want to edit.
- In the Form Template settings, you can:
- Change the primary color and font.
- Edit the headline, description, and featured image.
- Customize the Donate Now button text and style.
- In the Donation Options section:
- Set a minimum and maximum donation amount.
- In the Form Fields section:
- Add or remove fields like name, email, or phone.
- In the Donation Goal section:
- Enable or disable a visible goal meter.
Once you’re done, click Update to save your changes.


🏦 Step 6: Finalize Payment Settings
To configure how you collect donations:
- Go to Donations → Settings.
- Click the Payment Gateways tab.
- Enable payment options:
- Stripe (Credit Card)
- PayPal
- Offline Donations (optional)
- For each gateway, click Connect and complete the integration.
- In the Default Options tab:
- Choose which gateways are enabled by default.
- Configure additional options like required billing fields.
Click Save Changes when you’re done.
🎉 You’re All Set!
Congratulations — your WordPress site is now ready to accept donations! Whether you’re fundraising for a project, cause, or personal need, the GiveWP plugin makes the process simple and professional.
By using the steps outlined in this article, you’ll have a beautiful donation page that works seamlessly and securely. You can even track donation progress, send email receipts, and manage donors right from your dashboard.
Tags: WordPress, GiveWP, Donation Plugin, Donation Form, Stripe Integration, PayPal Integration, Fundraising, Nonprofit Website, WordPress Tips, WordPress Plugin
Hashtags: #WordPress #GiveWP #DonationPage #Fundraising #NonProfitTools #PayPal #Stripe #WordPressPlugins #WebsiteTips #WebDevelopment