File type associations in Windows determine which program opens a specific kind of file. For example, .txt files typically open with Notepad, .jpg with Photos, .pdf with Edge or Acrobat, and so on.
But sometimes, these associations get messed up — maybe you accidentally set a .csv file to open with Notepad or linked a .json file to WordPad. From that moment, every file of that type opens in the wrong program until you manually fix it.
In this detailed guide, we’ll walk through how to completely remove or reset file associations in Windows 10 and Windows 11 — setting them back to none or default, step by step.
You don’t need to install any external tool or registry tweak; everything can be done safely using built-in Windows options.
1. What Are File Associations in Windows?
Before diving into the fix, let’s take a moment to understand what a file association really is.
In Windows, each file type (based on its extension, such as .txt, .jpg, .docx, or .mp4) is “associated” with a particular program. When you double-click a file, Windows looks up that association in the system registry and launches the corresponding application automatically.
For example:
.txt→ Notepad.jpg→ Windows Photos App.pdf→ Microsoft Edge or Adobe Acrobat Reader.html→ Web browser (Edge, Chrome, etc.)
So far, so good. The problem arises when a user accidentally sets the wrong app to open a file type — say, a .csv spreadsheet opens in Notepad instead of Excel.
That’s where resetting or removing the file association becomes necessary.
2. Why Would You Want to Remove a File Association?
There are several situations where you might want to remove or reset file type associations:
- A file type got associated with the wrong app (like
.inior.batfiles opening in Notepad). - You want a file type to not open with anything by default, and only open when you manually select a program.
- You are troubleshooting file format conflicts or testing custom extensions.
- Certain file types (e.g.,
.reg,.cmd,.dll) shouldn’t have a regular app association for security reasons. - You just want to restore Windows’ default “no association” state for rare or developer file extensions.
Now that we know why this is useful, let’s walk through the steps to actually remove file type associations safely.


3. Step 1: Show File Extensions for All File Types
Windows hides file extensions by default, which can make it confusing to identify file types. To correctly change or remove associations, we first need to make extensions visible.
Let’s do that step by step.
🪜 Steps:
- Open the Start Menu and search for File Explorer Options.
- Click to open it.
- Go to the View tab.
- Look for the checkbox that says “Hide extensions for known file types.”
- Uncheck this box.
- Click Apply and then OK.
Now every file will display its extension (for example: document.txt, image.jpg, or data.json).
This simple change makes it easier to see what type of file you’re dealing with, and it’s essential for the next steps.
4. Step 2: Create a Dummy (Fake) File to Break the Link
Here’s the trick — Windows requires every file extension to be linked to some program. There’s no direct “set to none” button.
So, we’ll use a clever workaround: create a fake file with a unique extension that doesn’t exist anywhere else.
This new “dummy” extension will act as a temporary target to detach the wrong association.
Let’s move step by step.
🪜 Steps:
- Right-click on your desktop (or any folder) and choose New → Text Document.
- Name it anything you like — for example,
dummy.txt. - Now rename the file and change its extension to something unique like
.xyzor.123.
For example:
dummy.xyz
Windows will warn you:
“If you change a file name extension, the file might become unusable. Are you sure you want to change it?”
Click Yes.
This file will serve as your placeholder to “unlink” other file types later. You can delete it after the process is done.
5. Step 3: Reassign the Problematic File to the Dummy File
Now comes the main step — using the “Open with” option to break the unwanted file association.
Suppose your .ini file always opens with Notepad and you want to remove that association. Here’s what you do:
🪜 Steps:
- Right-click on the problematic file (for example,
example.ini). - Select Open with → Choose another app.
- Check the box that says “Always use this app to open .ini files.”
- Scroll down and click More apps.
- Then select Look for another app on this PC.
A file browser window will open.
- Navigate to the location where you created the dummy file earlier (for example, your Desktop).
- In the file picker, change the dropdown from “Applications (*.exe)” to “All Files (.)”.
- Select your fake file, such as
dummy.xyz.
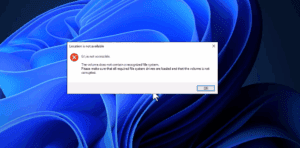
Windows will try to open it, realize it’s invalid, and remove the original association.
You may get a warning message like:
“This file cannot be opened by this program.”
That’s expected — don’t worry. Once this step is done, the file type will have no working program linked to it anymore.
6. Step 4: Delete the Dummy File and Restart
Now that you’ve successfully tricked Windows into breaking the previous file association, it’s time to clean up.
🪜 Steps:
- Delete the fake file you created earlier (
dummy.xyz). - Restart your computer to ensure all changes are applied.
After restarting, you’ll notice that the problematic file type no longer has an app icon or default program linked to it. When you double-click it, Windows will now ask:
“How do you want to open this file?”
This confirms the association has been completely reset.
Congratulations — you’ve just removed a file type association and set it to none!
7. Alternative Methods to Reset File Associations
While the “dummy file” method works universally and is simple, Windows also offers a few built-in ways to reset or modify file type associations. Let’s quickly explore them.
1️⃣ Using Windows Settings (Reset to Default)
If you simply want to restore all file associations to Microsoft’s defaults:
- Open Settings → Apps → Default Apps.
- Scroll down and click Reset (under “Reset to Microsoft recommended defaults”).
This will reset all associations to their original defaults — not just one file type.
⚠️ Note: This won’t set associations to “none” but will revert them to the default Microsoft apps (like Notepad, Edge, or Photos).
2️⃣ Using the Command Prompt (For Advanced Users)
If you’re comfortable with the command line, Windows allows you to delete file associations from the registry using built-in commands.
For example:
assoc .ext=
Replace .ext with your file extension — for example:
assoc .ini=
This command clears the existing association for .ini files.
After running it, restart your PC.
✅ Important: This method should only be used by experienced users, as improper registry edits can cause system instability.
3️⃣ Editing the Registry Manually
For those who prefer direct control, you can also remove file associations by editing the registry.
Here’s how:
- Press Windows + R, type
regedit, and press Enter. - Navigate to:
HKEY_CURRENT_USER\Software\Microsoft\Windows\CurrentVersion\Explorer\FileExts - Find the folder for the extension you want to modify (e.g.,
.ini,.txt,.pdf). - Right-click the folder and select Delete.
- Close the Registry Editor and restart your computer.
Windows will automatically recreate a clean entry for that file type with no linked application.
⚠️ Warning: Always back up your registry before making changes.
4️⃣ Using OpenWithList or OpenWithProgIDs Cleanup
Sometimes, removing a file association isn’t enough because Windows caches app recommendations. In that case, you can remove the cached “Open with” list:
- Navigate to the same registry path above (
FileExts). - Expand the file type’s folder and delete OpenWithList and OpenWithProgIDs subkeys.
- Restart your PC.
After this cleanup, the “Open with” history for that file type will be fully reset.
8. Frequently Asked Questions (FAQ)
Let’s clear up some of the most common doubts users have about file associations.
Q1. What happens if I remove a file association?
When you double-click a file with no association, Windows will prompt you to select a program manually. It won’t break or delete the file — it just means Windows doesn’t know what to use by default.
Q2. Can I completely disable file associations?
Not globally. Windows always expects file types to be associated with something. However, using the “dummy file” trick or the assoc command can effectively make them blank for specific extensions.
Q3. Is it safe to edit file associations in the Registry?
Yes — as long as you back up your registry before making changes and only modify known keys. Incorrect edits can cause issues with file handling.
Q4. Why does my file automatically open in Notepad or Edge?
This usually happens when Windows doesn’t recognize the file type and picks the nearest available program. You can reset it manually using the methods above.
Q5. Will this process affect other users on the same computer?
By default, most file associations are stored per user, not system-wide. That means other accounts on the same PC won’t be affected unless you edit the registry under HKEY_LOCAL_MACHINE.
Q6. Can I use third-party tools to manage associations?
Yes, utilities like Default Programs Editor or FileTypesMan from NirSoft can provide a graphical interface for editing associations.
However, use them cautiously — these tools modify the same registry entries you can edit manually.
For advanced users, you can explore FileTypesMan from https://www.nirsoft.net/utils/file_types_manager.html.
9. Final Thoughts
So far, we’ve done a great job understanding and fixing one of those subtle Windows quirks — the file association system.
While it’s convenient, it can sometimes misfire, linking your files to the wrong program or even breaking workflows for developers and creators.
By following the steps in this article, you can now:
- Remove incorrect file associations.
- Reset file types to “no association.”
- Restore Windows’ original prompt behavior when opening unrecognized files.
This process works for Windows 10, Windows 11, and even older versions with minor differences.
As a good housekeeping practice, keep file extensions visible and avoid assigning sensitive file types (like .bat, .cmd, .reg, .dll) to text editors. These files are meant for internal system processes.
If you frequently experiment with file types, you might want to take periodic registry backups or create System Restore points before modifying associations.
Disclaimer:
This article is intended for educational purposes to help users understand and safely modify Windows file type associations. Editing system settings or registry values should be done carefully. Always back up your data or registry before making changes. The author is not affiliated with Microsoft Corporation.
Tags: Windows 10 file associations, Windows 11 file type reset, remove file association, registry edit, default program, file explorer options, open with settings, Windows troubleshooting
Hashtags: #Windows10 #Windows11 #FileAssociations #TechFix #RegistryEdit #WindowsTips #Troubleshooting #DefaultPrograms


