Most modern Android phones, especially those from brands like OnePlus, Xiaomi, and Redmi, come with a built-in Infrared (IR) blaster. This small sensor allows your phone to act just like a universal remote control. Whether you’ve lost your AC remote, misplaced your TV remote, or just want to simplify life by having all your controls in one place, your phone can step in as the perfect solution.
In this article, we’ll guide you step by step on how to set up and use the IR Remote feature on your Android phone, explore different device connections, and share tips for smooth operation.
1. What is IR Remote and How Does It Work?
IR (Infrared) remote control technology is the same system used in traditional TV and AC remotes. It sends coded signals in the form of invisible infrared light to the device’s receiver.
When your phone has an IR blaster, it can emit these signals. By using a remote app, your phone can mimic the codes of actual remotes, allowing you to control:
- Televisions
- Air conditioners
- Set-top boxes
- DVD players
- Projectors
- Fans, lights, and even some smart appliances
This makes your phone a universal remote, eliminating the need for multiple separate remotes.
2. Checking if Your Phone Has IR Support
Not all smartphones have an IR blaster. To check:
- Look at the top edge of your phone – IR sensors are usually a small black dot.
- Check your phone specifications on the official website.
- Try searching for a “Remote” app that comes pre-installed (OnePlus, Xiaomi, and Redmi devices often include it).
If your phone lacks an IR blaster, you cannot use this feature natively. However, there are external IR blaster accessories that can be connected via the headphone jack or USB-C.
3. Preparing the Remote App
Most phones with IR support come with a built-in app like:
- OnePlus Remote App
- Mi Remote Controller (by Xiaomi)
- Universal Remote apps available on the Google Play Store
These apps contain preloaded databases of remote codes for thousands of brands and devices.
Before setting up, make sure your app is updated and accessible.
4. Step 1 – Clear Old Data Before Setup
When setting up IR remote control for the first time (or troubleshooting issues), it’s a good idea to reset the app:


- Long-press the remote app icon.
- Tap App Info.
- Go to Storage & Cache.
- Select Clear Data.
This ensures old settings don’t interfere with the new setup.
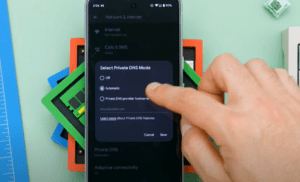
5. Step 2 – Open the IR Remote App
Once the app is reset:
- Open the IR Remote app.
- Tap on the Plus (+) icon to add a new remote.
- You’ll see a list of device categories such as:
- Air Conditioner
- TV
- Set-top box
- DVD Player
- Projector
- Fan
- Lights
- Air Purifier
- Water Heater
Select the device type you want to configure.
6. Step 3 – Add a New Device
For this example, let’s start with an Air Conditioner (AC):
- Tap Air Conditioner.
- The app will ask for your AC’s brand (Daikin, LG, Samsung, Voltas, Blue Star, etc.).
- Select the correct brand.
- Keep your phone’s IR sensor 1 to 1.5 meters away from the AC for the first pairing attempt.
7. Step 4 – Connecting to an Air Conditioner
Here’s what happens during setup:
- The app sends a signal → The AC should respond (beep, light, or action).
- If it responds → Tap Yes in the app.
- If not → Tap Try Again to send the next code.
Once the correct code is found:
- You can now use your phone to power the AC on/off.
- Adjust temperature settings.
- Control modes like Cool, Heat, Dry, Auto.
- Toggle swing and fan speed options.
👉 Note: Every brand and even individual models may have slightly different functions.
8. Step 5 – Using Barcode/QR Code Scan
Many modern appliances (washing machines, refrigerators, ACs, etc.) come with a barcode/QR code sticker.
- In the remote app, choose the Scan option.
- Allow camera access.
- Scan the barcode/QR code on your device.
This automatically fetches the correct remote profile, making setup faster.
9. Step 6 – Adding a TV Remote
Now let’s try with a Television:
- Select TV from the device list.
- Enter your brand (Sony, Samsung, LG, etc.).
- Point your phone toward the TV and test buttons:
- Power On/Off
- Volume Up/Down
- Channel Up/Down
- Menu Navigation
If the TV responds → confirm with Yes.
Now you can fully control your television from your phone.
10. Step 7 – Customizing and Renaming Remotes
Once a remote works:
- Rename it (e.g., “Living Room AC,” “Bedroom TV”).
- Add shortcuts for quick access.
- Organize multiple remotes into categories.
This way, you won’t get confused if you’re controlling multiple devices.
11. Step 8 – Creating Shortcuts for Easy Access
The remote app allows you to create shortcuts on your home screen.
- Tap Add Shortcut after saving a remote.
- A new icon will appear on your home screen.
- Tap it anytime to directly launch the remote without opening the main app.
If you no longer need a shortcut, long-press and Delete it.
12. Managing Multiple Devices
You’re not limited to just one device. You can:
- Add multiple ACs, TVs, fans, and appliances.
- Create shortcuts for each one.
- Switch between remotes inside the app.
For example:
- Bedroom AC
- Living Room TV
- Dining Room Lights
All can be stored in one app, eliminating clutter from physical remotes.
13. Troubleshooting Common Issues
While setup is usually smooth, here are some issues you may encounter:
- Device not responding → Make sure the phone’s IR sensor is pointing directly at the device.
- Wrong brand selected → Try another model from the same brand list.
- Signal only works close-up → Ensure no obstruction is blocking the IR signal.
- Multiple attempts needed → Some devices may require several trial codes before one matches.
14. Frequently Asked Questions
Q1. Does every phone support IR remote?
No. Only phones with an IR blaster support it. Check your phone’s specifications first.
Q2. Can I use IR remote without internet?
Yes. IR remotes work offline since they rely on infrared light, not Wi-Fi or mobile data.
Q3. What devices can I control with IR remote?
TVs, ACs, projectors, fans, lights, set-top boxes, DVD players, and some smart appliances.
Q4. Can I add remotes for devices of different brands?
Yes. You can add multiple brands and models inside the same app.
Q5. Will IR work through walls?
No. Infrared requires a clear line of sight. It won’t work if blocked by walls or obstacles.
15. Conclusion
With just a few setup steps, your Android phone can become a universal IR remote for your home appliances. Whether it’s your AC, TV, or set-top box, you can control everything from one device—your smartphone.
This not only saves you the hassle of handling multiple remotes but also gives you the flexibility of quick shortcuts, barcode scanning, and multi-device management.
So the next time your remote goes missing, don’t panic—just pull out your phone and take control.
⚠️ Disclaimer
This tutorial is intended for educational purposes only. Some functions may vary depending on the phone manufacturer, model, and remote app version. Always use official apps from your device manufacturer or trusted sources like the Google Play Store.
Tags
IR remote setup, Android remote control, OnePlus remote, smartphone IR blaster, universal remote app, control AC with phone, control TV with phone
Hashtags
#Android #IRRemote #OnePlus #SmartphoneTips #UniversalRemote #HomeTech


