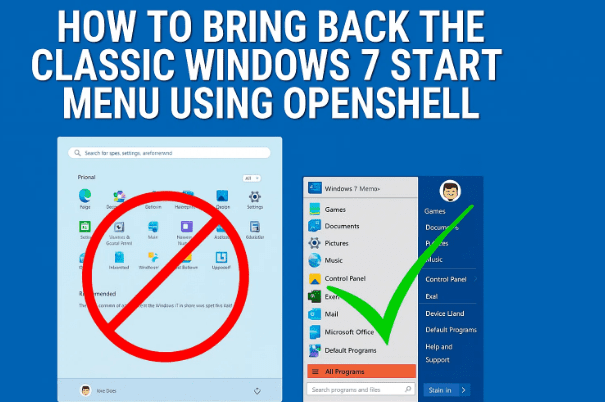
Windows 11 and Windows 10 introduced modern Start menus, but many users still prefer the simplicity and familiarity of the Windows 7 style start menu. If you’re one of those people who miss the old look and functionality, the OpenShell app can help.
OpenShell is a free, open-source program that revives the classic Start menu design with plenty of customization options. In this article, we’ll go step by step through installing, configuring, and personalizing OpenShell. By the end, you’ll have a retro-style Start menu that looks and works just the way you want.
1. What is OpenShell?
OpenShell is the spiritual successor of Classic Shell, a project discontinued in 2017. Developers and the open-source community continued its development, ensuring it works on modern versions of Windows.
- It brings back classic Start menus (Windows XP, Vista, or 7 style).
- Adds an optional Classic Explorer toolbar in File Explorer.
- Allows deep customization of the Start menu, taskbar, and menus.
📌 Download link: OpenShell on GitHub
2. Compatibility: Windows 7, 10, and 11
Before we move further, it’s important to understand what works and what doesn’t.
- Windows 7 → Already has the classic menu, but OpenShell still works for extra customization.
- Windows 10 → Fully supported. Most OpenShell features will function.
- Windows 11 → Some settings won’t apply because Microsoft locked down the UI further. For example, taskbar tweaks are limited.
👉 Keep in mind: If you try a setting and nothing changes, it’s likely a Windows 11 restriction.
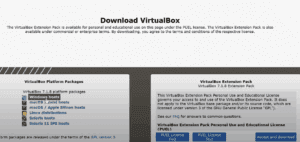
3. Downloading and Installing OpenShell
Installation is simple, but let’s go through it carefully:
- Download the installer from the official OpenShell GitHub page.
- Run the installer (
OpenShellSetup.exe). - Accept the license agreement.
- Optional: Skip the “Internet Explorer integration” since it’s outdated.
- Click Install (requires administrator rights).
- Finish the setup and close the installer.
Now OpenShell is ready. When you click the Start button, you’ll be prompted to choose a menu style.
4. Choosing Your Start Menu Style
This is where the fun begins. The first time you run OpenShell, you’ll see three main style options:
- Classic Style → Single-column list like Windows XP.
- Classic with Two Columns → A hybrid option.
- Windows 7 Style → The most popular, modern yet familiar.
👉 Most users prefer the Windows 7 style for its balance of functionality and aesthetics.
Don’t worry—you can always switch styles later from the settings. Or if you looking for more ways to customize Windows Start Menu dive into the following articles.


- The Best Start Menu Alternatives for Windows 11: Customization, Functionality & Nostalgia
- How to Fix Windows 11 Start Menu Not Working: Step-by-Step Guide
- Customize Windows 11 Taskbar, Start Menu, and More with Windhawk
- The Ultimate Guide to Optimizing Windows 11: Startup, Security, and System Management
- Customize the Windows 11 UI with Start11 v2 – The Ultimate Start Menu Replacement
- or get into the complete list here….!
5. Customizing the Start Button
OpenShell lets you replace the default Windows Start button with:
- Pre-installed button icons.
- A custom image of your choice.
This is a fun way to personalize your system. You could even use your own logo or a retro Windows orb.
6. Exploring the Start Menu Features
After enabling OpenShell, your new Start menu will look familiar. Let’s highlight the key sections:
- Left side → Applications, All Programs, pinned apps.
- Right side → Quick links to Documents, Pictures, Control Panel, Devices & Printers, and Shut Down options.
- Right-click options → Pin/unpin apps, customize items, or remove entries.
Tip: If you ever want to access the default Windows 11 Start menu, click the small button inside the OpenShell menu.
7. Configuring OpenShell Settings
To unlock its full potential, open OpenShell Settings (you can right-click the Start button or find it in the Start Menu folder).
Here’s what you’ll see:
- Basic Settings → Control what happens when you press the Windows key or left-click Start.
- Shutdown Command → Decide if “Shutdown” appears, or replace it with Restart, Log Off, etc.
- Backup & Restore → Save your customized settings into an XML file and reuse them on another PC.
💡 Example: If you disable “Shutdown” and later miss it, you can easily bring it back from the dropdown menu.
8. Changing Skins and Themes
If you’re tired of the plain look, OpenShell allows you to apply skins:
- Default → Immersive (clean, modern).
- Midnight → Dark-themed start menu.
- Classic → Nostalgic Windows XP-style.
Other options include:
- Show/hide user picture.
- Adjust icon size.
- Change transparency levels.
Switching skins gives your Start menu a completely fresh vibe.
9. Advanced Options: Taskbar, Search, and Shortcuts
Now let’s go a little deeper. OpenShell includes advanced settings that give more control:
- Taskbar tweaks → Limited in Windows 11, but functional in Windows 10.
- Customize items → Choose how Documents, Pictures, or Control Panel appear (as a link, menu, or hidden).
- Search Box → Enable/disable or configure how it searches (programs only, or internet as well).
- Animations → Choose whether menus fade, slide, or pop instantly.
- Context Menus → Right-click menu options for quick actions.
👉 Example: If you don’t like the search bar inside your Start menu, you can disable it completely.
10. Classic Explorer Settings
OpenShell doesn’t just stop at the Start menu—it also enhances File Explorer.
Enabling Classic Explorer Settings adds a retro toolbar with buttons like Copy, Paste, Delete, and Rename.
- You can customize which buttons appear.
- Drag and drop commands like “Rename” or “New Folder” for quick access.
- Toggle status bar and navigation pane styles.
⚠️ Note: Many of these Explorer tweaks don’t work in Windows 11 due to restrictions, but they function better in Windows 10.
11. Saving, Backing Up, and Restoring Configurations
OpenShell offers a great way to save time:
- Backup settings into an XML file.
- Import settings on another PC to get the same menu instantly.
- Reset to default if you want a clean slate.
This is extremely useful if you experiment with many options or reinstall Windows often.
12. FAQs: Common Questions
Q1: Will OpenShell break Windows 11?
👉 No. It’s safe to use. If you uninstall it, everything returns to normal.
Q2: Why don’t some settings work in Windows 11?
👉 Because Microsoft locked down certain UI elements. Most features still work, but taskbar and Explorer tweaks may not.
Q3: Can I make OpenShell look like Windows XP?
👉 Yes. By selecting “Classic Style” with a matching skin, you can replicate the XP menu.
Q4: Will this affect performance?
👉 No. OpenShell is lightweight and has negligible system impact.
Q5: How do I uninstall it?
👉 Just go to Control Panel → Programs → Uninstall a Program → OpenShell. Your Start menu will return to normal.
13. Final Thoughts
For users who love the nostalgia and usability of older Windows Start menus, OpenShell is a gem. It doesn’t just mimic Windows 7—it gives you the freedom to customize every corner of your Start menu and even File Explorer.
If you’re on Windows 10, nearly everything works seamlessly. If you’re on Windows 11, you’ll still enjoy the classic menu, though with fewer taskbar/explorer tweaks.
The best part? It’s completely free, and you can undo changes anytime by uninstalling it.
⚠️ Disclaimer
OpenShell is a safe, open-source tool. However, modifying system interfaces may occasionally cause minor conflicts with Windows updates. Always download it from the official GitHub page and create a restore point before applying deep customizations.
Tags: windows 7 start menu, openshell, classic shell, windows customization, start menu replacement, windows 10, windows 11
Hashtags: #OpenShell #Windows11 #Windows10 #StartMenu #ClassicShell #Customization


