There may be times when a WordPress update introduces bugs or conflicts with your themes and plugins. In such cases, downgrading to a previous version can be a quick fix until a compatible update is released. This article will walk you through how to safely downgrade your WordPress version using a plugin — without breaking your site.
Let’s get started.
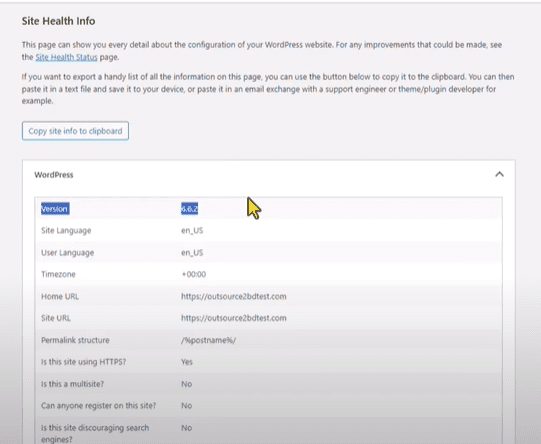
🔍 Step 1: Check Your Current WordPress Version
Before downgrading, it’s essential to know which version you’re currently using.
- Log into your WordPress admin dashboard.
- Go to Tools → Site Health.
- Click the “Info” tab.
- Scroll to the WordPress section to find your current version (e.g., 6.6.2).
🔧 Step 2: Install the “WP Downgrade” Plugin
To downgrade safely, we’ll use a plugin called WP Downgrade | Specific Core Version.
- In your WordPress dashboard, go to Plugins → Add New.
- In the search bar, type “WP Downgrade”.
- Look for the plugin named:
- WP Downgrade | Specific Core Version by Reisetiger
- Click Install and then Activate the plugin.
📥 Step 3: Configure the Downgrade Settings
Once the plugin is activated:
- Go to Settings → WP Downgrade.
- You’ll be taken to the plugin’s configuration screen.
- In the Current WordPress Version field, you’ll see your installed version (e.g., 6.6.2).
- To downgrade, you need the version number you want to switch to.
- Click the link labeled “WP Releases” to access the full list of available WordPress versions:
https://wordpress.org/download/releases/ - Find your desired version (e.g., 6.5.5), then copy that version number.
- Click the link labeled “WP Releases” to access the full list of available WordPress versions:
- Paste the copied version number into the Target Version box in the plugin settings.
- Click Save Changes.
⬇️ Step 4: Start the Downgrade Process
Once the target version is saved:
- Click “Downgrade Core”.
- Then, click “Re-install” when prompted.
WordPress will now begin reinstalling the selected version. This may take a few moments.
✅ Step 5: Verify the Downgrade
Once the installation completes:
- Go back to Tools → Site Health → Info → WordPress.
- Confirm that your site now shows the new (older) version (e.g., 6.5.5).
- Visit the front end of your site to ensure everything is functioning correctly.
🔒 Important: Always Back Up First
Before performing any core update or downgrade, it’s strongly recommended to back up your full WordPress website — including your database and files — using tools like:
- UpdraftPlus
- All-in-One WP Migration
- Duplicator
This gives you a fallback option in case anything goes wrong during the downgrade.
🎉 Conclusion
That’s it! You’ve now successfully downgraded your WordPress version without any risk to your site. This method is simple, safe, and ideal when you encounter plugin/theme compatibility issues after an update.


If you’re troubleshooting bugs or regressions introduced by a newer version of WordPress, this technique can buy you time until a stable fix or update becomes available.
Tags: WordPress, WP downgrade, WordPress downgrade tutorial, WordPress version control, WP core, plugin tutorial, website maintenance, WordPress troubleshooting
Hashtags: #WordPress #WPDowngrade #WordPressTips #WebsiteMaintenance #WPPlugin #TechTutorial #WPHelp #WebsiteTroubleshooting


