If you’re tired of your Windows system feeling sluggish, cluttered, or overloaded with apps you never use, there’s a powerful open-source utility that can help — WinScript.
Whether you’re a power user or just someone who wants a cleaner, faster PC, this guide will walk you through how to download, run, and use WinScript to speed up and declutter Windows 10 and Windows 11.
🧩 What is WinScript?
WinScript is a free, open-source desktop utility that helps you:
- Debloat unnecessary apps and services
- Disable privacy-invading features and telemetry
- Improve system responsiveness and boot time
- Enable performance tweaks (like the Ultimate Performance power plan)
- Manage hidden system settings with ease
🔗 Official GitHub Page for WinScript
💡 Disclaimer: WinScript must be run as Administrator. Windows Defender may flag it due to its ability to modify system settings — but this is a false positive. The tool is completely open-source and safe to use.
🖥️ System Before Optimization: A Common Scenario
On a fresh Windows 11 installation, you’ll likely see:
- Over 130 background processes running
- CPU usage hovering around 25%
- Memory usage above 2.2 GB (on a 4GB system) even with no apps open
- Useless apps like Feedback Hub, Xbox, Widgets, Microsoft Teams, Weather, CoPilot, and more occupying resources
This bloat not only slows down your computer but also affects responsiveness and boot time. Enter WinScript to clean up the mess.
🧰 How to Download and Run WinScript
- Visit the GitHub page:
🔗 https://github.com/flick9000/winscript - Click on “Releases” on the right sidebar or scroll to the “Assets” section.
- Download either:
WinScript_Installer.exe— to install itWinScript_Portable.exe— to use without installation
- If Windows SmartScreen blocks the download:
- Click on More Info → Run Anyway
- Or go to your browser’s downloads section → Keep Anyway
- Run as Administrator:
- Right-click the
.exefile → Run as Administrator
- Right-click the
🔧 Exploring WinScript’s Powerful Features (Tab-by-Tab)
🛠️ Tool Section
- Shortcuts: Quickly open hidden system tools like
Device Manager,Visual Effects,Virtual Memory, etc. - Cleanup: Run disk cleanup, empty recycle bin, delete temp files.
- Verify System Integrity: One-click DISM and SFC scan to repair corrupt files.
- Create Restore Point: Backup your current settings before changes.
- Reset Network / Clear Browser Data: Troubleshoot or clean up browsing history.
🧹 Debloat Section (Use with Caution)
Remove:
- Third-party apps
- Microsoft apps (Weather, Teams, Xbox, News, Widgets)
- Microsoft Edge, CoPilot, OneDrive, and even the Microsoft Store
✅ You choose exactly what to keep or remove.
⚠️ Tip: Always create a restore point before deep debloating.
🔐 Privacy Section
Disable:
- App access to Camera, Microphone, Location, Call History
- Cloud Sync and Activity Feed
- Telemetry for Windows, Office, Search, Ads, etc.
- Internet access for Windows DRM, Speech Recognition, etc.
- Telemetry from third-party apps like Chrome, Firefox, Adobe
✅ A must-use section if you’re privacy-conscious.


🎮 Gaming Section
For gamers, this tab can:
- Disable Fullscreen Optimization
- Disable Mouse Acceleration
- Disable Game Bar
- Enable Ultimate Performance Power Plan
- Set system DNS to Cloudflare or Google for better ping
⚡ Performance Section
- Enable Ultimate Performance Plan
- Set Services to Manual (for services that don’t need to run at boot)
- Disable Hibernation, SuperFetch, Storage Sense, Search
- Disable Core Isolation (for gamers who want better performance over security)
🎨 UI Tweaks (BISQUE Tab)
Customize:
- Bring back Windows 10’s classic right-click menu
- Show file extensions
- Enable dark mode
- Add End Task to context menu
- Move Taskbar icons to the left
- Disable Sticky Keys, Num Lock at startup
- Enable Detailed BSOD and Verbose Login
🌐 Browse Apps (Optional)
Want to install popular browsers or drivers?
- Use the built-in downloader for Chrome, Brave, Firefox, and more
- You can also install tools or drivers directly from the app
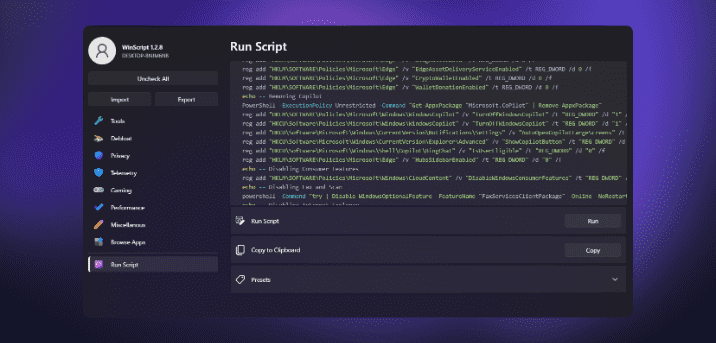
▶️ Final Step: Apply Changes
- After configuring everything, click Run Script.
- WinScript will ask: “Do you want to create a restore point?” → Click Yes
- Sit back and wait — it may take 3–5 minutes depending on what changes were selected.
- You’ll get a detailed report afterward confirming:
- Apps removed
- Features disabled
- System restored/optimized
📊 System After Optimization: Real Results
After using WinScript:
- CPU usage dropped to under 10%
- RAM usage dropped by 1 GB+
- Process count reduced from 135 → 120
- Threads and handles reduced significantly
- Start menu and taskbar look cleaner and faster
It feels like a brand new PC—without actually reinstalling Windows.
❓ FAQ Section
Q1: Is WinScript safe to use?
✅ Yes. It’s open-source and transparent. False positive warnings are due to its ability to modify system settings.
Q2: Will it break anything?
🛑 If used irresponsibly, yes. Always create a restore point before applying changes.
Q3: Can I reinstall removed apps later?
Yes, you can reinstall from Microsoft Store or manually.
Q4: Is this better than CCleaner?
💯 In many cases, yes. WinScript goes deeper than cleanup—it adjusts privacy, telemetry, and system settings.
📝 Final Thoughts
If you’re struggling with a laggy Windows experience, WinScript is like a digital handyman. It doesn’t just clean—it declutters, optimizes, and lets you regain control of your system. Whether you’re a gamer, a privacy-focused user, or someone who just wants Windows to work right, WinScript is a must-try tool.
🛠️ Tags:
windows optimization, win11 speedup, win10 debloat, system performance, open-source tools, telemetry removal, privacy tweaks, system cleanup
📢 Hashtags:
#WinScript #WindowsOptimization #DebloatWindows #SpeedUpPC #OpenSourceTools #WindowsTweaks #PrivacyMatters #TechTips


