Creating reusable blocks—also known as patterns—in WordPress is a great way to save time and maintain consistency across your content. Whether it’s a styled button, a section layout, or a call-to-action, reusable blocks can be inserted into any post or page with just a few clicks.
This article will walk you through:
- How to create a reusable block in WordPress
- How to access and insert that block into another post
- How to make a reusable button for repeat use
Let’s get started.
✏️ Step 1: Open the WordPress Post Editor
To begin, go to your WordPress dashboard and open any post (or create a new one) using the Block Editor.
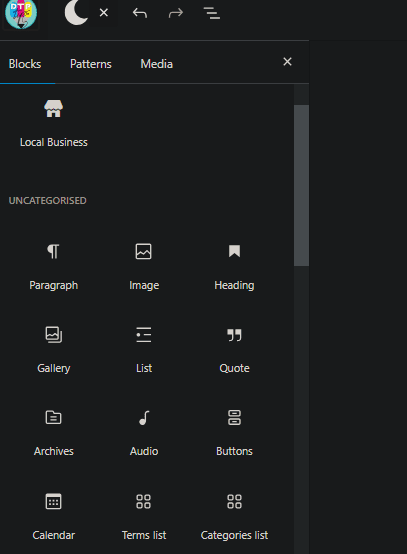
🧱 Step 2: Select a Block to Make Reusable
- In the editor, click on the block you want to make reusable.
- Click the three-dot menu (⋮) in the block toolbar.
- Select “Create pattern” from the dropdown menu.
Note: Previously this was called “Reusable Block,” but WordPress now refers to them as Patterns.
- Give your pattern a name that describes its purpose (e.g., “Call to Action Section”).
- Click Create.
Your reusable block has now been saved and can be used in other posts or pages.
📥 Step 3: Insert the Reusable Block in Another Post
- Open another post or page in the Block Editor.
- Click the “Add Block” (+) button.
- Click “Browse All” to open the full block library.
- Navigate to the “Patterns” tab.
- Click on “My Patterns”.
- Here you’ll see a list of all your saved reusable blocks.
- Click on the one you want to insert.
And that’s it—your pattern has been added to the new post!
🔘 Step 4: Create a Reusable Button Pattern
Want to reuse a styled button? Here’s how:
- In your post editor, click Add Block → Button to insert a Buttons block.
- Customize the button with your text, style, color, and link.
- Click on the button block, then click the three-dot menu (⋮).
- Choose “Select parent block” to ensure you’re selecting the entire Buttons group.
- Again, click the three-dot menu and select “Create pattern”.
- Name your button pattern (e.g., “Subscribe Button”) and click Create.
📋 Step 5: Use the Reusable Button in Another Post
- Open another post or page.
- Click Add Block → Browse All → Patterns → My Patterns.
- Select your saved button pattern, and it will be added instantly.
You can now use this button across multiple posts, maintaining a consistent look without redesigning it every time.
✅ Why Use Reusable Blocks?
- Efficiency: Design once, use everywhere.
- Consistency: Maintain visual and structural harmony across content.
- Easy Updates: Update one pattern, and changes reflect everywhere (if synced).
🏁 Final Thoughts
Using reusable blocks (patterns) in WordPress is one of the easiest and most powerful ways to streamline your content creation process. Whether you’re building call-to-actions, testimonial sections, pricing tables, or buttons — reusable blocks will save you tons of time.
Explore more creative ways to use patterns and elevate your WordPress publishing game!


Tags: WordPress, Gutenberg Editor, Reusable Blocks, WordPress Patterns, Content Creation, Web Design, Blogging Tips, WordPress Editor, Block Editor
Hashtags: #WordPress #Gutenberg #BlockEditor #ReusableBlocks #WebDesign #ContentCreation #BloggingTips #WordPressTips #WordPressDesign #WebsiteManagement